Landscape & Outdoor Services

Get expert advice and DIY tips on landscaping and outdoor projects in Whittier, CA from design to installation and maintenance.

How Do I Get Rid Of Clover In Grass?

How Do I Get Rid Of Clover In Grass? Simple Steps That Actually Work!

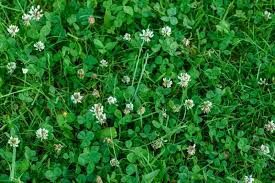
Clover may appear innocent enough, but it can easily take over your beautiful green lawn. If you are considering how to get rid of clover in grass without hurting your lawn, it will involve consistent care alongside the right natural treatments. Whether you are trying to eliminate clover from grass or just maintain a healthy lawn that is even, knowing what causes clover growth can help you control and limit its future growth How to identify clover Clover often goes unnoticed in your lawn until it begins to develop soft, bright-green patches that are not quite like the grass. Knowing how to identify clover early will give you better chances to have a lush, uniform yard and to prevent it from spreading. It is necessary  lawn maintenance  to get get rid of clover in lawn. Leaf Shape and Pattern Clover can easily be recognized due to its iconic three-leaf configuration. Each leaf is tiny, rounded, and usually demonstrates a pale white “V” stretched across its center. A four-leaf clover can be occasionally spotted, but the majority have three leaves. Growth Habit Clover grows low to the ground and creates thick mats that take up space where weak grass would normally grow. The creeping stems allow it to quickly spread across thin or bare areas of the lawn, and this is why it is commonly found in these areas of poor or compacted soils. Flowers and Color In the spring and throughout summer, clover gets small creamy white or somewhat pink flowers which attract bees. The leaves are softer and a more vibrant shade of green than most grasses, so you can easily notice them when sunlight hits the lawn. Where It Thrives Clover grows well in lawns that are lower in nitrogen. By properly fertilizing, you can strengthen your grass and reduce clover competition. Once you routinely check your lawn, you can track clover and decide how to address clover organically before it turns into a larger issue. How to get rid of clover     Clover may seem innocent, but once it has spread across the lawn it can crowd out healthy grass and give your yard a patchy look. Fortunately, eliminating clover from grass won’t injure your yard – you simply need to cultivate the right level of care, patience and consistency.  Understand Why Clover Grows Clover commonly emerges when soil is deficient in nitrogen or the grass is thin. Instead of attacking clover plants immediately, start by enriching the soil. A slow-release nitrogen fertilizer cultivates the grass, which will then compete against clover and other weeds. Manual Removal for Small Patches If you only see a small amount of clover, you may simply pull the clover out by hand. If needed, use a small weeding tool to pull out the clover roots. Once the clover is removed, water the soil and reseed small areas with grass to avoid the clover from returning.  Encourage Healthy Lawn Growth A thick, healthy lawn is the best defense to avoiding clover. Mow your lawn slightly higher (approximately 3-4 inches), so it shades out clover. Water your lawn deeply and less frequently to allow for more developed roots. Occasionally aerate your lawn (once a year is a good recommendation), to improve soil health and reduce compaction. Natural Treatments That Work If you are looking for something that you can spray on the clover in your lawn safe, mix a solution of white vinegar, dish soap and water and spray directly on the clover leaves. Apply this on sunny days for best results – the solution works by essentially drying the weed out and is safe for most grasses.  Long-Term Prevention To keep the grass healthy enough to fend off future clover growth, continue with regular mowing, watering, and feeding. If you’re looking for something herbicide safe you can spray on the clover in your lawn, make a solution of white vinegar, dish soap, and water, then spray on the leaves of the clover plant. Apply the solution during a sunny day for the best result, as this works by effectively drying out the weed, and is safe for most grasses. If you would prefer a more hands-off style of dealing with weeds, you can hire an organic lawn care company to professionally track and treat weed growth while continuing to protect the grass from damage. If you are willing to remain consistent and focus on soil health rather than toxic chemicals, you can naturally get rid of clover and enjoy a greener, thicker, and healthier lawn through the fall and winter. How to prevent clover in your lawn The first step in stopping clover from overtaking your lawn is understanding why it shows up in the first place. Clover prefers to grow in poor soil conditions or where the grass is weak. If you can improve your lawn’s condition and perform regular upkeep, you can stay ahead of clover before it becomes an issue. Strengthen the Soil Healthy soil discourages clover growth. In the spring and fall apply a slow-release nitrogen fertilizer to ensure that your grass stays strong and healthy. Test your soil once a year for soil pH (ideally 6.0-7.0). Use organic compost or lawn food to replace nutrients that support the gradual growth of grass.  Mow at the Right Height Clover thrives in short, closely cut lawns. Increase the height of your mower (about 3–4 inches) so the taller grass blocks the sun from reaching the clover seedlings in the soil. Making this simple adjustment will reduce weed growth over time. Water Deeply, Not Often Light watering promotes shallow roots, which clover loves. Instead, water your lawn a good soak only once or twice a week for deep strong grass roots. Strong grass naturally outcompetes weeds like clover. Reseed Bare or Thin Areas Bare spots are an invitation for clover to encroach. Reseed thin areas in the early spring or the fall. You want to keep your lawn thick and lush! A thick lawn provides trained weeds with no

How Do I Get Rid Of Clover In Grass? Simple Steps That Actually Work! Read More »

Top 10 Landscaping Trends in 2025

Top 10 Landscaping Trends in 2025 for Modern Homes – Sustainable & Stylish Ideas

Landscaping is more than just about making your outdoor space look pretty. In 2025, it’s all about sustainability, functionality, and design elements that merge effortlessly with modern architecture. Whether you have a sprawling backyard or a compact front yard, these landscaping trends are transforming how we connect with nature in our homes. Let’s dive into the Top 10 Landscaping Trends in 2025 for Modern Homes and see how these ideas can bring your outdoor spaces to life. 1. Sustainable Landscaping Practices As eco-consciousness continues to grow, sustainable landscaping has become one of the top priorities for homeowners. More and more people are looking to reduce their environmental impact by using drought-resistant plants, xeriscaping, and eco-friendly materials. These sustainable practices not only save water but also minimize the use of harmful chemicals in your garden. Eco-friendly designs don’t have to be expensive. Check out our guide on how much does landscaping cost to plan your sustainable upgrade wisely. 2. Native Plants Are Taking Over Native plants have been gaining popularity, and in 2025, they’re expected to dominate the landscaping scene. By using plants that naturally thrive in your region, you’ll not only reduce the need for maintenance but also create a habitat for local wildlife. Whether it’s wildflowers, grasses, or shrubs, native plants are perfect for homeowners looking to enhance their yard’s biodiversity. 3. Outdoor Living Spaces In 2025, outdoor living spaces are no longer just a luxury; they’re essential. People are investing more in creating functional and stylish outdoor areas that feel like an extension of their homes. Think cozy patios, fire pits, comfortable seating, and well-designed kitchens. These areas serve as the perfect spot for entertaining friends or simply unwinding after a long day. 4. Smart Technology in Landscaping Technology continues to evolve in landscaping, with smart irrigation systems, automated lighting, and even robotic lawnmowers becoming more common. These innovations save time and energy, allowing you to enjoy a beautifully maintained yard without the hassle. In 2025, integrating these technologies will be essential for modern homes, offering both convenience and efficiency. 5. Minimalistic Design Minimalism is not just a trend in interior design but also in landscaping. The focus in 2025 is on clean lines, simple layouts, and low-maintenance plantings. Modern homeowners are choosing sleek designs that allow for easy upkeep while still offering a beautiful, tranquil environment. Think geometric garden beds, simple stone paths, and carefully placed plants. 6. Vertical Gardens and Green Walls Space is becoming more of a premium, especially in urban areas. To make the most of smaller yards or apartment terraces, vertical gardens and green walls are a great option. These structures allow homeowners to grow plants vertically, creating a lush green environment in areas where horizontal space is limited. In 2025, these living walls will be a key feature in many modern landscaping designs. 7. Water Features with a Purpose Water features, like fountains or small ponds, are no longer just decorative; they now serve a more practical role. In 2025, homeowners are opting for water-efficient features that can help with irrigation or even be used to filter rainwater for garden use. These eco-friendly water features combine aesthetics with sustainability, creating a calming atmosphere while reducing water consumption. 8. Edible Landscaping The edible landscaping trend is not new, but it’s definitely growing in popularity. People want to transform their outdoor spaces into areas that provide fresh produce, whether it’s herbs, fruits, or vegetables. This trend is especially relevant in 2025 as more homeowners prioritize growing their own food. Imagine having a beautiful garden filled with edible plants that also provide you with fresh ingredients for your meals. 9. Natural Materials Over Synthetic In 2025, natural materials are taking center stage. Homeowners are moving away from synthetic options like plastic turf and opting for organic materials like wood, stone, and gravel. These materials are not only more sustainable but also blend seamlessly with the environment, creating a more harmonious outdoor space. Whether it’s for pathways, garden borders, or furniture, natural materials are the go-to choice for landscaping in 2025. 10. Low-Impact, Wildlife-Friendly Landscaping Finally, there is a growing shift towards landscaping that encourages biodiversity. Homeowners are designing their outdoor spaces to support local wildlife by planting pollinator-friendly flowers, creating birdhouses, and incorporating other elements that attract insects, birds, and small animals. This low-impact, wildlife-friendly approach not only enhances your garden’s beauty but also plays a critical role in preserving local ecosystems. Conclusion The Top 10 Landscaping Trends in 2025 for Modern Homes clearly show a shift towards eco-conscious, functional, and minimalist designs. Whether you’re embracing native plants, installing smart systems, or designing an outdoor kitchen, there’s no better time than now to rethink your landscaping approach. Modern homes are evolving, and your outdoor spaces should reflect that transformation. By adopting some of these trends, you’ll not only improve the look and feel of your home but also contribute to a more sustainable and enjoyable environment for years to come. Transform Your Landscape in 2025 Upgrade your outdoor space with sustainable, stylish, and modern landscaping solutions tailored for your home. Call (562) 208-0148  Get Landscape Design Services

Top 10 Landscaping Trends in 2025 for Modern Homes – Sustainable & Stylish Ideas Read More »

what is hardscaping

What is Hardscaping: Create Stunning Outdoor Spaces

Hardscaping is an essential part of any outdoor design. Unlike planting flowers or trees, hardscaping focuses on the non-living elements of your garden or yard. It includes pathways, patios, decks, walls, and other structures that give your outdoor space shape and functionality. Understanding what is hardscaping can help homeowners and designers create a beautiful and practical outdoor environment. The Difference Between Landscaping and Hardscaping Landscaping often refers to the living elements of a yard like plants, flowers, and lawns. Hardscaping, on the other hand, refers to everything that does not grow. While landscaping adds color and life, hardscaping provides structure and durability. When combined thoughtfully, they transform a yard into a cohesive and inviting space. Common Types of Hardscaping Hardscaping can take many forms depending on the style and purpose of your outdoor space. Some common types include: Patios and Decks: These areas are designed for relaxation and social gatherings. Using stone, brick, or wood can add a distinct character to your backyard. Garden Pathways: Pathways guide visitors through your garden while protecting delicate plants. Materials like gravel, flagstone, or concrete are popular choices. Retaining Walls: Retaining walls prevent soil erosion and create levels in a sloped yard. They also serve as design features when combined with plants or lighting. Water Features: Although technically static structures, ponds, fountains, and waterfalls add beauty and a sense of tranquility. Outdoor Kitchens and Fire Pits: These installations make outdoor living more enjoyable and increase property value. Benefits of Hardscaping Adding hardscaping to your yard has several benefits. One of the biggest advantages is low maintenance. Unlike plants, hardscape structures do not require watering, pruning, or fertilizing. They also improve property value by creating functional spaces for entertaining or relaxing. Hardscaping can also prevent soil erosion, improve drainage, and reduce maintenance for lawns. Planning Your Hardscaping Project Before starting a hardscaping project, planning is key. Assess the space and consider your lifestyle and the climate. Think about how you want to use the space and which materials will best suit your needs. Personal experience shows that mixing different textures like wood, stone, and metal can create a more dynamic outdoor environment. Sketching a layout or using design software can save time and cost during construction. Choosing the Right Materials Materials are a critical part of any hardscaping project. Natural stone gives a timeless look, while concrete offers flexibility and durability. Wood adds warmth and complements gardens beautifully. Pavers are perfect for pathways and patios as they are easy to install and maintain. The choice of materials affects both aesthetics and functionality, so it is important to balance appearance with practicality. Maintaining Hardscaping Although hardscaping is low maintenance, it still requires care. Regular cleaning prevents moss or algae buildup, and sealing stone or concrete can extend their lifespan. Retaining walls and pathways should be checked periodically for cracks or erosion. With proper maintenance, hardscaping can last for decades, adding long-term value to your home. Hardscaping and Outdoor Living Spaces Hardscaping is central to creating outdoor living spaces. By combining patios, seating areas, fire pits, and pergolas, you can extend your home’s living space into the garden. Personal experience shows that the right layout encourages social interactions and enhances relaxation. Planning zones for dining, lounging, and gardening helps maximize the usability of your yard. Sustainability in Hardscaping Sustainable hardscaping is becoming more important as homeowners look for eco-friendly solutions. Using recycled materials, permeable pavers, and native stones reduces environmental impact. Integrating water-efficient irrigation and drainage systems also contributes to sustainability. Hardscaping does not have to harm the environment if thoughtful materials and designs are chosen. Common Mistakes in Hardscaping Even experienced homeowners can make mistakes with hardscaping. Common errors include ignoring drainage, choosing the wrong materials, and not considering scale. It is also important to blend hardscaping with the natural landscape to avoid a stark or artificial look. Proper planning, consultation with professionals, and careful execution can prevent these mistakes. Cost Considerations Hardscaping can be a significant investment. Costs depend on materials, labor, and project complexity. While stone and custom designs are expensive, alternatives like gravel and standard pavers offer budget-friendly options. It is important to plan according to your budget while prioritizing quality and durability. Hardscaping Trends Modern hardscaping trends focus on multifunctional and visually appealing outdoor spaces. Minimalist designs, outdoor kitchens, integrated lighting, and water features are popular. Sustainable materials and low-maintenance landscapes are also trending, reflecting a shift toward functional and eco-conscious outdoor design. DIY vs Professional Hardscaping Some homeowners prefer DIY hardscaping to save money, but complex projects like retaining walls or patios often require professional expertise. Personal experience shows that hiring a professional ensures structural integrity and reduces mistakes, especially for large or multi-level projects. Enhancing Aesthetics with Hardscaping Hardscaping allows you to express creativity in your outdoor space. Combining textures, colors, and shapes can create visual interest. Personal touches like decorative stones, garden sculptures, or unique seating areas make a yard unique. Hardscaping provides a canvas for blending nature with design. Conclusion Understanding what is hardscaping is essential for anyone looking to improve their outdoor spaces. It combines beauty and functionality while enhancing property value. By carefully planning your design, selecting the right materials, and maintaining your hardscape, you can create an outdoor space that is both practical and visually stunning. For more inspiration on landscaping and outdoor design visit: Landscape Design Frequently Asked Questions How long does hardscaping last? With proper care, most hardscaping elements can last decades. Does hardscaping increase property value? Yes, well-designed hardscaping can significantly improve curb appeal and market value. Is hardscaping expensive? It varies, but there are options for all budgets, from gravel paths to custom stone patios. Can I do hardscaping myself? Small projects are suitable for DIY, but large or structural elements require professional installation. What is the best material for a patio? Stone, concrete, pavers, and wood are common choices, each offering unique aesthetics and durability. How do I maintain my hardscape? Regular cleaning, sealing, and checking for damage ensures

What is Hardscaping: Create Stunning Outdoor Spaces Read More »

How to Clean Artificial Turf

How to Clean Artificial Turf | A Complete Homeowner’s Guide

Synthetic grass is supposed to be lush and green all year without much work, but “low maintenance” doesn’t mean “no maintenance.” Dust, dust mites, pet waste, spills, and heavy foot traffic may also have an impact on how it looks and smells. Turf fibres can flatten, odours can develop, and drainage efficiency may be reduced if it is not well-maintained. Knowing how to Clean Artificial Turf the right way helps retain its appearance, lengthen its life, and keep your outdoor environment healthy. If your turf is in a backyard, playground, rooftop, or commercial space, this guide will teach you the best tools, methods, and maintenance habits to help keep it looking great and performing well for years. Why Regular Artificial Turf Maintenance Matters Regular maintenance of turf is important as it undergoes continual exposure to weather and wear with outdoor use. Dust, pollen, leaves , and other airborne debris slowly accumulate between the fibres, making the turf look dull and, if left for too long, can impact the drainage. Cleanliness is a major part of hygiene, apart from looking nice. When turf is used by pets or children, it can harbor bacteria and odors if not cleaned correctly. Routine care of the material also prevents buildup and reduces allergens, which means a safer surface for daily use. Regular maintenance will not only preserve the attractiveness of your lawn but will also pay for your investment. The artificial turf is strong enough, but neglect can cause the turf mats, infill displacement, and premature wear-off. Simple, regular cleaning can help maintain the turf structure and keep it looking almost new. Essential Tools and Supplies for Turf Cleaning Cleaning synthetic turf is easy and cheap without needing any special tools. Most homeowners can easily do their routine maintenance with simple equipment that’s small enough to fit in a closet and for which they can find daily use. A stiff broom or turf rake is needed to raise the matted-down fibers and to remove the loose debris on top. A garden hose with a gentle stream is perfect for rinsing dirt, pollen, and small stains from grass blades without damaging the turf’s back. For most synthetic turf cleaning simple soaps, vinegar solutions, or the like will suffice. Avoid harsh chemicals, chlorine, or abrasives as these can strip the color and damage the fibres and/or the structural integrity of the turf. Step-by-Step Guide: How to Clean Artificial Turf Properly Knowing how to clean ensures you get the best results for your turf without damaging it. Maintenance is straightforward and achievable when you stick to a routine. Remove Loose Debris and Organic Matter Start by removing loose debris such as leaves and twigs. Rake, broom, or blow leaves and other debris, then repeat this a few times from different directions; don’t crush the blades of grass. Removal of organic material at an early stage prevents mulling and drainage problems. This is required weekly in high-use areas and seasonally or as required in low-use areas. Keeping the debris cleaned off the artificial turf not only keeps the artificial turf surface breathable, but also keeps it looking great. Rinse the Surface Thoroughly When all debris is removed, hose down the turf. Wet and dry by hand. Dust, spills, and pet residue tend to build up in certain places. Water acts as a vehicle for transporting contaminants from the surface through the drainage system and keeps debris from accumulating under the turf. Do not use high-pressure washers unless the manufacturer specifically advises so. Too much pressure can push out infill or unglue seams, making the turf less stable. Spot Clean Stains and Odors For food, drink, or pet waste stains, use a soft-bristle brush to apply a solution of mild soap and water. Gently rub the area and rinse well. The technique is excellent for routine artificial turf cleaning that won’t harm fibers. Long-lasting odors can be treated with enzyme cleaner or diluted vinegar solutions. They neutralize smells, rather than covering them up, so the turf stays fresh and clean for everyday use. You may read How Much Does Lawn Care Cost? Managing Pet Waste and Hygiene on Artificial Turf Maintaining cleanliness on pet turf is necessary to avoid penicillin or bacterial buildup. It is a good idea to clean up solid waste promptly, as you would on natural grass. After removal, rinse the area with water to get rid of residue. For households with multiple animals, periodic deep cleaning will help the home stay fresh and keep odors from becoming ingrained. Pet-safe enzyme cleaners used from time to time enhance the sanitation as well as the synthetic turf cleaning effectiveness without putting your pets at risk from dangerous chemicals. Understanding Turf Flattening and Fiber Recovery With time, the persuasion of the feet to the ground tends to make the fibres tired and liedown so to speak, giving it a more worn-out look. This is a routine process and is not indicative of turf failure. Brushing the turf against the nap repositions fibers. The process evenly redistributes the infill and brings the turf back to its natural look. Regular brushing also promotes better drainage and foot comfort. Often described as synthetic turf reblooming, this fiber renewal process is an important element in both immediate and long-term turf care. Artificial Turf Reblooming | Restoring a Like-New Appearance Reblooming is an important upkeep procedure for aged or heavily trafficked turf fields. Artificial turf reblooming means the artificial grass fibers are brushed upright, and the infill that has become compacted over time is redistributed. In certain applications, a supplemental infill may be applied to help support fiber structure and cushioning. This treatment ensures that the turf keeps its natural look and that you don´t get an early wear out. Although professional reblooming services can be hired, light reblooming is something many homeowners can do themselves if they have the right tools and a bit of patience. Seasonal Cleaning Tips for Long-Term Turf Care There are various challenges for turf maintenance in each season. Changing the cleaning strategy with the time of year guarantees a uniform execution and appearance. More leaf debris is falling in autumn, so you need to sweep more regularly to stop solids from building up. In the summertime, dust and pollen may need to be rinsed off regularly to keep colors

How to Clean Artificial Turf | A Complete Homeowner’s Guide Read More »

what is landscaping

What Is Landscaping? A Unique Guide to Outdoor Beauty

Here is the simple answer of question, “What is landscaping?”, Landscaping is the art and practice of shaping outdoor spaces so they look attractive and function well. It blends living elements like turf, trees, and native plants with non-living features such as patios, pathways, retaining wall structures, and decks. Good landscaping not only improves beauty but also adds value to property and makes outdoor areas more enjoyable to use. It’s a balance of landscape architecture, hardscape, softscape, and practical systems like irrigation and drainage solutions. What do landscapers do Many people ask what do landscapers do, and the answer is broader than most expect. Landscapers start with a design consultation, then prepare a planting plan and a cost estimate or project quote. They handle site grading, sod installation, turf laying, and lawn returfing, while also building hardscape features like pavers, patios, and decks. Beyond installation, they provide pruning, mulching, seasonal cleanup, and set up irrigation system zones with smart irrigation controllers. Some even offer a landscape maintenance plan or service contract so property owners can keep their spaces in top condition year-round. Types of landscaping services There are many types of landscaping services, usually grouped into design, installation, and maintenance. Landscape design involves planning where hardscaping and softscaping should go, while installation puts those ideas into reality with features like patios, pathways, and drought tolerant landscaping. Maintenance ensures the property remains healthy and includes lawn care, fertilization, aeration, weed control, and regular pruning. Depending on needs, clients can choose residential landscaping services for homes and yards, or commercial landscaping services for larger spaces like malls, campuses, or offices. Landscape design Landscape design is the first step in transforming any outdoor area. A designer studies the site, plans out drainage solutions, and decides where to place both hardscape and softscape features. A thoughtful design often includes native plants and xeriscaping methods to reduce water use and maintenance. With a clear planting plan, installation becomes easier, costs are more predictable, and the final result feels intentional rather than random. Landscape maintenance No landscape lasts without care, which is why landscape maintenance is so important. A maintenance plan or service contract might include mowing, aeration, fertilization, weed control, pruning, mulching, and seasonal cleanup. Regular upkeep protects against pests, encourages growth, and keeps both softscape and hardscape features looking their best. Many property owners choose recurring service because it saves time and ensures consistent results. Read more about: “What is Landscaping maintenance?” Hardscaping vs softscaping Hardscaping vs softscaping is a key distinction in landscaping. Hardscaping covers the non-living parts such as retaining wall structures, patios, decks, and paved pathways. Softscaping, on the other hand, includes the living components like trees, shrubs, turf, and other plants. Hardscaping gives structure and solves issues like drainage or erosion, while softscaping brings life, color, and seasonal change. A successful project balances both for beauty and durability. Residential landscaping services Residential landscaping services are designed for homeowners who want to enhance their outdoor spaces. These often include sod installation, lawn returfing, small patios, irrigation upgrades, and planting of drought tolerant or native plants. Most projects begin with a design consultation and a project quote to set expectations. For families, these services can improve curb appeal and create inviting backyards that support daily living. Commercial landscaping services Commercial landscaping services cater to businesses, malls, schools, and office campuses. They usually involve larger teams, heavy-duty equipment, and long-term service contracts. Common tasks include installing irrigation systems, setting up smart irrigation controllers, providing drainage solutions, and managing durable hardscape features for high-traffic areas. Commercial work emphasizes safety, accessibility, and consistency, ensuring outdoor spaces look professional and are easy to maintain. Irrigation and drainage solutions Irrigation and drainage solutions are the backbone of a healthy landscape. Modern irrigation systems include drip irrigation, sprinkler zones, and smart irrigation controllers that adjust based on weather. Drainage solutions may involve site grading, French drains, or permeable paving to keep water from pooling. Without these systems, even the most beautiful planting plan or hardscape can fail over time. How much does landscaping cost A common question is how much does landscaping cost, and the answer depends on project size, materials, and labor. Design work has its own fees, while hardscape features like patios, pavers, or a retaining wall add higher costs than planting alone. Adding an irrigation system or specialized drainage solutions can also raise the budget. Here is the table that includes approximate cost ranges for common services like design, hardscaping, irrigation, and maintenance. Service Type Estimated Cost Range Landscape Design $1,500 – $10,000 per project Hourly Labor (landscapers) $50 – $150 per hour Landscaping (per sq ft) $4 – $20 per square foot Sod Installation $0.80 – $1.80 per square foot Sprinkler System $1,800 – $5,200 Drip Irrigation (per zone) $300 – $1,200 per zone Lawn Seeding $0.04 – $0.18 per square foot Water Features (small) $500 – $8,000 depending on type Landscape Maintenance (monthly) $100 – $300 per month Basic Mowing (per visit) $30 – $85 per visit Final steps The best way to begin any landscaping project is with a clear design consultation, planting plan, and cost estimate. A balanced mix of hardscaping, softscaping, irrigation, and drainage solutions will make your outdoor space both beautiful and practical. If you are in Whittier or nearby, Robert Complete Care Landscaping can handle every step for you, from design and installation to maintenance, lawn care, hardscaping, and sustainable landscaping. Reach out today and let our team bring your vision to life. Frequently Asked Questions (FAQs) What is included in landscaping services? Landscaping services usually include design, installation, and ongoing maintenance. That can mean lawn care, pruning, mulching, irrigation system setup, hardscaping like patios and pathways, and drainage solutions to keep outdoor areas functional and attractive. How much does landscaping cost? The cost of landscaping depends on the size of the project, materials, and labor. Small jobs like sod installation may be a few hundred dollars, while larger projects with patios, retaining wall features, and irrigation

What Is Landscaping? A Unique Guide to Outdoor Beauty Read More »

what is landscape maintenance

What Is Landscape Maintenance? Services & Costs Explained

I am a landscaper expert and I am here to answer your query “What is landscape maintenance?” Landscape maintenance is the daily and seasonal care that keeps a yard alive and working. It is mowing, pruning, watering, feeding the soil, fighting pests and keeping paths safe. It is also the small fixes that stop big problems later. I have worked on lawns and gardens for years. I see the same patterns. A steady schedule and a few correct moves make a landscape reliable and low stress. When I arrive on a new property I walk every zone. I look at soil, plant health, irrigation and how the owners use the space. That short walk tells me what to do first. A good maintenance rhythm follows from that simple check. Landscape maintenance cost Cost comes down to size and complexity. A small front yard that only needs mowing and edging costs less. A yard with many shrubs trees and a drip system costs more. I price jobs by hours and by tasks. Irrigation repair tree work and seasonal jobs add to the bill. I always show clients a simple estimate that lists visits and supplies. That way the client knows the landscape maintenance cost up front. I also add a small allowance for repairs. From experience this avoids surprises and keeps trust. Residential maintenance Yard size (approx.) Per visit mow/edge Monthly basic (weekly) Monthly full service* Townhome / 1,500–3,000 sq ft $30–$45 $120–$180 $180–$260 Small lot / 1⁄8 acre $40–$60 $160–$240 $240–$360 Standard lot / 1⁄4 acre $55–$80 $220–$320 $320–$480 Large lot / 1⁄2 acre $70–$110 $280–$440 $480–$800 Estate / 1 acre $100–$180 $400–$700 $800–$1,400 Common add-ons Service Typical range Notes from the field Seasonal clean-up (per visit) $150–$450 Debris haul, leaf work, cutback, bed refresh Core aeration (lawn) $120–$280 Once a year or as needed Fertilization (per app) $75–$200 Price scales with lawn size Pre/post-emergent weed control $60–$180 Per app, lawn or beds Mulch install (material + labor) $55–$125 per cu yd 2–3″ depth, edging extra Hedge/shrub pruning visit $120–$350 Light shaping and haul away Tree pruning (small ornamental) $200–$450 Larger trees quoted on site Irrigation diagnostics + tune $85–$160 Up to 1 hour on site Irrigation repairs $25–$65 per head Plus labor time and parts Bed refresh (weed, edge, top-up) $120–$320 Great for quarterly visits Commercial and multi-unit Property type Typical pricing approach Ballpark full-service monthly Small retail or office pad Per visit or monthly $350–$900 Strip center / small HOA Monthly contract $900–$2,200 Larger HOA / campus Per acre per month $700–$1,600 per acre Hourly and crew guidelines Role Typical hourly bill rate Maintenance crew (per worker) $45–$80 Lead tech / irrigation tech $65–$110 Arbor crew (per worker) $85–$140 Benefits of landscape maintenance The benefits are real and easy to see. Regular care keeps plants strong so they need fewer chemicals. A clean yard improves curb appeal and can increase property value. Good pruning keeps trees safe and walkways clear. Proper irrigation saves water. Healthy soil means less replacement and lower cost over time. I have seen tired yards come back to life in one season after focused care. That change makes homeowners use their outdoor space more. That is the best benefit of all. Landscape maintenance tips Start with the soil. Most problems begin there. Water deeply and less often so roots grow strong. Mow to the right height for your grass type. Prune to remove dead wood and to shape growth. Mulch to hold moisture and to cut weeds. Test soil before you feed heavily. Check irrigation lines often and fix leaks fast. Keep a short log of what you do and when. From my work a simple log helps more than memory. It shows patterns and points to the right fix. Landscape upkeep checklist A short checklist saves time and keeps things consistent. Use this each month. mow and trim lawn inspect irrigation and run each zone pull weeds from beds and edges prune dead branches and shape shrubs top up mulch where needed check for pests and disease sweep paths and clear debris Add seasonal items. In spring add fertilizing and bed clean up. In summer tune irrigation and check water use. In fall aerate and remove leaves. In winter prune and secure plants for storms. Landscape maintenance plan A plan makes work repeatable. Start with a site assessment. Note plant types irrigation layout shade and problem spots. Decide how often to visit. List tasks per visit. Add seasonal tasks for each quarter. Set a simple budget for materials and emergency repairs. Give the homeowner clear updates and a short report after visits. I write goals too. For example increase turf density or reduce weed cover. Then I compare results each season. A written landscape maintenance plan keeps expectations real and reduces calls for extra work. Hiring and DIY from my toolbox Many owners can handle mowing basic pruning and watering. Hire pros for trees irrigation repair and soil restoration. When I hire a crew I ask for a written scope and a trial month. That shows how they work and how reliable they are. If you DIY focus on the basics first. Get the irrigation running right. Improve soil. Then fine tune pruning and fertilizing. Smart and sustainable choices I use I use timers and smart controllers to avoid wasted water. I plant drought tolerant varieties in sunny zones. I prefer mulch and organic amendments to heavy chemicals. For pests I use targeted solutions not blanket sprays. These choices cut cost and build a stronger landscape. Keep Your Landscape Healthy Year-Round Get a custom landscape maintenance plan designed to save you time and keep your yard thriving. Call (562) 208-0148 Get Maintenance Service   FAQs What is landscape maintenance? Landscape maintenance is the regular care of lawns, plants and hardscapes. It includes mowing, pruning, watering, fertilizing and checking irrigation. How much does landscape maintenance cost? Cost depends on yard size, plant types and how often you want service. Small yards can be

What Is Landscape Maintenance? Services & Costs Explained Read More »

How to Install Landscape Fabric

How to Install Landscape Fabric Right | Step by Step Guide

Over the years of working in gardens and helping friends build neat yards one lesson always comes back simple preparation makes or breaks the project. When I first used landscape fabric in my own flower beds I did not pay much attention to the way I laid it down. Weeds crept in through the edges and water did not drain well. Later after more trial and error I found that the right approach saves a lot of time. In this guide I will walk you through how to install landscape fabric in a way that keeps weeds under control without harming the soil. What is Landscape Fabric Landscape fabric also called weed barrier fabric or weed barrier is a sheet of woven or non woven material placed over the soil to block sunlight and reduce weed growth. Some people call it garden liner or geotextile fabric. It is mostly used under mulch gravel or rocks. It works as a weed control cloth but still allows water to pass through. Pros and Cons of Landscape Fabric Using landscape fabric is not a one size fits all solution. The pros are clear fewer weeds less time spent on pulling grass and a cleaner look for beds and pathways. Heavy duty landscape fabric lasts longer under gravel or stone walkways. The cons are worth noting too it can stop organic matter from mixing into soil and sometimes roots struggle if the fabric is not cut properly. That is why some gardeners look into alternatives to landscape fabric such as thick mulch cardboard or natural ground covers. Tools and Materials Needed From experience the right tools make the process easy. You will need scissors or a utility knife to cut the fabric. Garden staples or pins are needed for securing edges. A rake helps smooth the soil and a wheelbarrow is handy for mulch or rocks. Remember you must cut holes where plants will go so keep a sharp blade nearby. Step by Step Installation Guide Prepare the areaClear weeds and level the soil. This first step decides how well the barrier fabric will perform. Measure and cut the fabricRoll out the sheet and cut it to fit. This is how to cut landscape fabric properly measure twice cut once. Lay and secure the fabricPlace the material flat and overlap edges by a few inches. Use staples to secure. This is how to secure landscape fabric so it does not shift. Cut planting holesFor each shrub flower or vegetable slice a cross shaped hole. This keeps weeds out but lets roots through. Cover with mulch or gravelAdd a layer of mulch stone or gravel on top. If you are working with rocks you now have landscape fabric under rocks or under gravel which is one of the most common uses. This process is the same if you are asking how to lay weed fabric how to lay weed barrier how to put down weed barrier how to install weed fabric or even how to install a weed barrier. Many people search these terms but the steps stay consistent. Special Applications In flower beds I prefer using fabric under mulch. In driveways or paths I switch to heavy duty landscape fabric under gravel. For decorative rock areas you will find landscape fabric under rocks helps stop weeds but still drains water. In vegetable gardens I sometimes avoid it because mistakes to avoid with landscape fabric include trapping soil too tightly. Choosing the Best Landscape Fabric There are many options on the market. If you want long life choose a heavy duty landscape fabric. For small gardens simple weed barrier fabric is fine. If you are shopping you will find garden weed barrier rolls of weed barrier fabric and other types. The best landscape fabric for weed control is the one that matches your soil type and project. Mistakes to Avoid and Alternatives Common mistakes include not securing the edges letting the fabric overlap poorly or forgetting to cut enough planting holes. Another mistake is using it under shrubs that need organic matter in soil. If you want other choices consider alternatives to landscape fabric such as natural mulch straw or even biodegradable sheets. Conclusion From my own use of landscape fabric in gardens and rock beds I can say it is worth the effort if you prepare the area properly. Whether you are using landscape fabric for flower beds gravel driveways or decorative stones the method stays the same. Install it with care cut it well secure it tightly and cover with mulch or rock. Done right it saves you time on weeds and keeps your yard neat for seasons to come. Professional Landscape Installation Get expert help with fabric, mulch, rock, and garden bed installation in Whittier for a weed-free, beautiful yard. Call (562) 208-0148 Book Installation Service FAQs related to Landscape Fabric Q1: Does landscape fabric really work? Yes, landscape fabric works when installed correctly and used for the right type of project. It helps block weeds while still allowing water to pass through. Q2: Should I put landscape fabric under mulch or gravel? Yes, using landscape fabric under mulch or gravel helps reduce weeds and keeps your garden beds or pathways neat and low-maintenance. Q3: How long does landscape fabric last? The lifespan depends on the type. Heavy-duty sheets can last for many years under gravel, while lighter fabrics may only last a few seasons. Q4: Is landscape fabric good for flower beds? Yes, landscape fabric for flower beds works well, but it’s important to enrich the soil before placing it so plants get proper nutrients.

How to Install Landscape Fabric Right | Step by Step Guide Read More »

how to install a sliding patio screen door

how to install a sliding patio screen door

One of the easiest and best technological upgrades to improve comfort in the home is the addition of a sliding patio screen door. It  allows fresh outside air to enter the home while keeping the bugs and dust outside, which makes enjoying the patio a year ’round prospect. More importantly, patio screen door installation need not be a difficult endeavor when properly planned. In fact, most homeowners can successfully install a sliding patio screen door, if equipped with basic tools and a bit of patience. The trick is to concentrate on accurate measurements, smooth sliding screen door assembly, and a snug fit, so the sliding screen door will operate smoothly. Learning how to installing a sliding screen door properly will ultimately save you money on a paid professional, and it is a practical skill to learn for any homeowner. This guide will show you how to install sliding screen doors.   Tools and Materials You Will Need for Installation Before starting your screen door installation, it’s important to have the right tools and materials ready. Proper preparation ensures your sliding screen door installation goes smoothly and saves time during the process. Measuring Tape: Accurate measurements are critical to the success of any project, so using a measuring tape to verify the height/width of the door frame can ensure that the sliding screen door assembly fits your door frame properly without gaps. Screwdriver or Drill:  Tightening screws, attaching handles and securing rollers and track guides require the use of a screwdriver or a power drill. Using the correct tool will provide a tight fit and a reliable work station. Rollers and Track Guides : These small but crucial parts allow the screen door to glide smoothly across the track. Without properly adjusted rollers and guides, the door may stick or slide unevenly. Sliding Screen Door Assembly Kit : This kit typically includes the frame, mesh screen, and all required hardware needed to install a sliding screen door completely. Always select a kit for sliding screen doors that corresponds to your frame size. Level: Keeping the installation straight is vital. A level helps you align the frame so the door operates correctly and lasts longer. Safety Gloves:  Protect your hands while handling sharp edges, metal parts, or screws. Comfort and safety make the work much easier. With these tools prepared, your sliding screen door installation will be efficient, secure, and durable. How to Install a Sliding Screen Door: Step-by-Step Instructions Since you have prepared and are ready to go, let’s jump into the installation process. It looks complicated at first, but a simple guide will make it much easier than it seems. Step 1: Remove the Old Screen (if applicable) The first thing to do when installing a sliding screen door is to take out the old door. Make sure that the track or rollers holding the old door in place are properly unscrewed without applying significant force to the door. When removing the mesh for a patio model, take your time and be careful not to bend or damage the frame. Depending on the age and condition of the existing screen door unit, the removal of the door can take a considerable amount of time or be quite fast. After the old door or screen door is removed, you can begin preparing the frame and hardware for your new screen door. If you do the removal correctly, everything in the sliding screen door assembly will install easier and will ultimately be more secure in the long run. Step 2: Install the Track for Your Sliding Screen Door The track is what supports your sliding screen door so it slides easily. Before you install it, be sure to check for levelness of the track. Measure the length of your door frame, and then carefully cut the track to fit into your door frame. Once the track is in place, screw the track down securely. Proper alignment during the sliding screen door installation process is very important, if the track is not level or shifted a bit, your door could stick or scrape or not slide. properly at all. Taking time to align and securing your track should provide you with a smooth and worry-free screen door installation and make the entire sliding screen door assembly much easier. Step 3: Prepare the Sliding Screen Door for Insertion: Confirm the proper attachment of the rollers before sliding the door into position. These rollers allow the screen door to easily slide along the door track. If the rollers are not installed correctly, they may not operate properly which may make it difficult to slide the door. When the rollers are in their place, carefully lift the door into place. If the door is heavy or large, you may want to have someone assist you at this point. Step 4: Install the Sliding Screen Door The most critical part of installing the sliding screen door has arrived, putting the door into the track. To begin, carefully place the rollers into the track and then lift and slide the door into place. Go slowly and make sure the frame sits evenly in the track, adjusting as needed. After the screen door is set, slide the door back and forth to verify the proper movement. A properly installed screen door should glide smoothly without sticking or dragging. Step 5: Adjust the Door for Proper Functionality The next task is to make sure the door functions properly by adjusting it. Mostly, if the door does not slide easily, it needs to have the rollers adjusted. If necessary, you can tighten or loosen the screws on the rollers with your screwdriver. Ensure the door is resting tightly in the track. Also, check the screen mesh and ensure that is tight and secure to prevent sagging. Conclusion Installing a sliding patio screen door is not just an enjoyable DIY project, but also a good way to provide more airflow to your home while keeping bugs out! With a little patience, some

how to install a sliding patio screen door Read More »

How Much Turf on a Pallet

How Much Turf on a Pallet? The Answer Might Surprise You!

Your Whittier backyard’s looking pretty rough right now—those brown patches are probably driving you crazy. And you’re wondering: How much turf on a pallet can I actually order to fix this thing? Here’s the honest truth: most pallets cover somewhere between 400 and 500 square feet, but the real number changes depending on who you’re buying from, what grass type you pick, and how thick they cut it. I know that’s frustrating when you just want a straight answer. But here’s the good news—once you actually understand what’s going on, ordering sod is super simple. No confusing math, no surprises. Let’s walk through this together. What Is a Turf Pallet? A turf pallet is a wooden base stacked with rolls or slabs of sod (grass with soil attached). Farmers cut sod in standard pieces, then pile them onto pallets for easy delivery. Why use pallets? Easier to move and transport. Keeps sod neat and safe. Helps customers know how much area one pallet will cover. Turf can come in: Slabs – rectangular pieces. Rolls – long strips, great for bigger lawns. Popular grasses sold on pallets include Bermuda, St. Augustine, Zoysia, Fescue, and Kentucky Bluegrass. Understanding Sod Pallet Coverage (Without the Corporate Jargon) Let me break this down the way I’d explain it to a friend over coffee. When sod arrives at your house, you’re getting grass that’s been grown for months. It comes with soil attached, roots and all. It’s basically instant lawn. Each piece measures about 16 inches by 24 inches—think of it like a small yoga mat made of grass. That one piece covers about 2.67 square feet. Here’s what actually matters: A typical pallet of sod square feet usually lands somewhere around 450 square feet. But I’m saying “usually” because I’ve genuinely seen variation. One supplier we work with regularly gives us about 165 pieces per pallet. Another gives us 155. Same grass, different farms, different coverage. The difference comes down to a few things. Some grass types are just naturally thinner. Bermuda grass, for instance, isn’t as dense as St. Augustine. So when they lay it on a pallet, you get more pieces but they’re lighter overall. St. Augustine is thicker and heavier, so fewer pieces but denser coverage. Both end up covering roughly the same area, just differently. Then there’s thickness. Some suppliers grow their sod thicker for durability during transport. Others keep it thin to save money. The standard size of a piece of sod doesn’t change, but that thickness affects how many pieces fit on a pallet and how the grass performs after installation. When we order for Robert Complete Care customers, we’ve learned to ask our suppliers exactly what we’re getting. Not just the price. Not just the coverage number they put in their brochure. We actually ask questions like: “How many pieces?” “How thick?” “Is that 450 square feet measured how?” This matters. What Factors Affect Grass Cost in Whittier Now let’s talk about the part that actually hits your wallet. The pallet of sod cost in Whittier isn’t fixed. I wish it were. It’s influenced by things you’d expect and things you wouldn’t. First, the grass itself. Not all sod is created equal. In Whittier, your main options are typically Bermuda, St. Augustine, or Zoysia. Bermuda is usually the most affordable—usually runs you around $150 to $250 per pallet depending on the supplier. St. Augustine is middle ground, hitting somewhere between $250 and $350. Zoysia? That’s the premium option. You’re looking at $300 to $400 per pallet, sometimes more if you want specialty varieties. Why the price difference? It’s about growing time, durability, and performance in our Whittier climate. Cheaper grass isn’t necessarily bad. It just means different characteristics and different establishment speed. We recommend whatever matches your yard conditions and your water access honestly. Timing matters way more than people think. Spring and summer? That’s peak season. Everyone wants their lawn installed May through September. Prices are higher because demand is crushing supply. Fall and winter, especially September through February? Prices drop. You’ll find better deals, though you’re installing into a slower-growth season. We’ve had customers save 20 to 30 percent ordering in fall versus spring. Where you buy from changes the price. Some suppliers include delivery if you’re within a certain distance (like 10 miles). Others charge per mile after that. Some just give you one flat price and you figure it out. We always get the actual total cost to your property, not just the pallet price. There’s a massive difference. And here’s something most people don’t think about: Quality affects pricing, and pricing affects outcome. We’ve seen homeowners buy the cheapest sod available, have it installed, and then watch it struggle in our heat. Then they’re calling us six months later asking why it’s not thriving. Turns out, that cheap sod either wasn’t grown properly or wasn’t handled right before delivery. Now they’re looking at sodding again. Quality sod costs more upfront. But it roots faster, establishes better, and actually lasts. That’s a fact we’ve confirmed through years of installations. Standard Turf Pallet Sizes In the U.S., a pallet usually has 400–500 sq. ft. of sod. In other countries (UK, Australia, UAE), pallets usually cover 35–50 sq. m. Weight: 1 pallet can weigh 1,500–3,000 lbs (680–1,360 kg). Turf Pallet Size Chart Region Coverage per Pallet Rolls/Slabs Weight U.S. 400–500 sq. ft. 50–70 rolls 1,500–3,000 lbs UK / Europe 40–50 sq. m 60–75 rolls 700–1,400 kg Australia / UAE 35–45 sq. m 55–70 rolls 650–1,200 kg Always check with your supplier, because sizes can be different. How to Calculate How Much Turf You Need Measure your lawn Length × Width = Area. Example: 40 ft × 20 ft = 800 sq. ft. Add extra for waste Add 5–10% for cutting and trimming. 800 sq. ft. + 10% = 880 sq. ft. Work out pallets needed One pallet = 450 sq. ft. 880 ÷ 450 = about 2 pallets.  Quick Formula: Lawn size (sq. ft.)÷Coverage per

How Much Turf on a Pallet? The Answer Might Surprise You! Read More »

How to Clean a Concrete Patio

How to Clean a Concrete Patio | Quick & Effective Solutions

Maintaining your concrete patio is not only a great way to improve the appearance of your outdoor area, but also prolong its life. Over time, patios develop dirt, stains, mold, and algae, dulling the surface, and contributing a slippery surface. Fortunately, if you know the best ways to approach cleaning your patio, you can achieve a fresh and clean appearance in short order. From simple household cleaning methods, to specialized concrete stain removers, there are many options for cleaning up tough stains and build-up. For extra cleaning on patios and deeper stains, many homeowners turn to their favorite concrete cleaning product, which can effectively break down dirt, stains, and algae, without damaging the surface. Your ideal cleaner will often vary based on the stains, and the amount of build-up you have on your patio (patio). Whether you prefer eco-friendly, biodegradable solutions, or your favorite patio cleaner formula, this post will cover the most effective cleaning steps to revive the outdoor space. Before You Begin Make sure to remove everything from your concrete patio before applying any concrete patio cleaner. Furniture, grills, plants, or even children’s toys should all be removed so that you have a clear space to work in. You can use a sturdy push broom or even a leaf blower, and just sweep away dust, leaves or any loose debris. After you have cleared the patio, you can spray it down with a garden hose and nozzle to moisten the concrete prior or to help loosen any stuck-on dirt. When to Clean a Concrete Patio To keep a concrete patio in good shape, it should be cleaned periodically. Seasonal cleaning can help remove dirt, stains, and algae, while a deep cleaning will be needed after heavy use or weather changes. A concrete stain remover works best for stubborn stains, while quality concrete cleaning solutions can help refresh the surface. If you want long-lasting results, use the best concrete patio cleaner that is intended for outdoor use. A dependable patio cleaner will help ensure that your outdoor space is safe, smells nice, and is inviting for all seasons. Tools Need To Clean Clean A Concrete Patio   Stiff-Bristle Brush – Ideal for scrubbing stains after applying a patio cleaner. Pressure Washer or Garden Hose – Helps rinse away dirt, algae, and cleaning products thoroughly. Bucket & Measuring Cup – For mixing the best concrete patio cleaner with water. Protective Gear – Gloves and goggles keep you safe while using concrete cleaning products. Scraper or Putty Knife – Useful for removing dried gum, paint, or stubborn debris before applying a concrete stain remover. Mop or Squeegee – Speeds up drying and prevents water spots. Directions for Cleaning a Concrete Patio A concrete patio that has recently been cleaned looks appealing and will last longer when you regularly maintain it. The right products and the right tools will help you remove mildew, dirt, stains, and buildup, without damaging the concrete surface. Below is a straightforward process that anyone can easily do. Step 1 — Prepare the Area Remove furniture, plants, and other décor. Using a stiff broom, sweep the surface to remove dust, leaves, and debris. Step 2 — Spot Treat Stains Use a concrete stain remover directly on oil, rust, or grease stains. Let it sit according to the manufacturer instructions and lightly rinse. Step 3 — Mix Your Cleaner Select the suitable concrete patio cleaner for your needs. For the most part, a solution that is mild but effective works best on protecting the surface. Step 4 — Scrub the Patio Use a stiff brush or deck brush to scrub the cleaner into the concrete. For larger areas, a pressure washer on low will speed up the process. Step 5 — Rinse and Maintain Rinse the patio thoroughly with a garden hose, continuing until all residue is gone. A reliable patio cleaning routine every few months is a good way to keep your outdoor area looking fresh and inviting.  Common Mistakes to Avoid When Cleaning Your Concrete Patio Maintaining a concrete patio is easy, but many homeowners make mistakes that shorten its life or make it dull looking. The main principle is to use the appropriate tools and products and be cautious of practices that can cause damage. Here are some common mistakes to avoid: Using Harsh Chemicals Without Testing If you pour strong cleaners directly on the surface, this could cause stains or erosion. Always begin with a concrete stain remover that is safe for outdoor use, and try it on a small spot first. Choosing the Wrong Cleaning Products Household detergents or bleach may seem convenient but can leave streaks and discoloration. Invest in quality concrete cleaning products specifically designed for patios. Over-Scrubbing the Surface Brushing concrete with metal brushes may scratch the surface. You should instead use the best concrete patio cleaner with a soft-bristle brush or low-pressure washer to achieve the best results. Forgetting to Rinse Thoroughly If you do not rinse away your patio cleaner, this can leave residue, attract dirt, and dull the finish. Make sure to always rinse thoroughly to ensure a spotless finish on your patio.   Conclusion:   Having a clean concrete patio not only improves appearance but can increase lifespan and make outdoor spaces more enjoyable. The best method will depend on the stains present and what chemical agents you are able to use. For normal dirt and mildew build-up, widely used concrete cleaning agents with a scrub brush can make your concrete patio look new again in no time. If you have tough stains like stubborn oil, rust, or mold, then a specialized concrete stain removal agent will work effectively, breaking down deeper stains without damaging the concrete surface.  For any homeowner who would rather use a ready-to-use option, your best bet is to invest in a good concrete patio cleaner. A good cleaner is designed to address multiple stains and provide the best and fastest results with the least effort and scrubbing. You may also consider

How to Clean a Concrete Patio | Quick & Effective Solutions Read More »