Uncategorized

Woman using a Honda self-propelled mower on a sloped backyard lawn, next to a man pushing a lightweight electric push mower on a small flat yard.

Self-Propelled vs Push Mower: Which One Is Actually Worth Your Money?

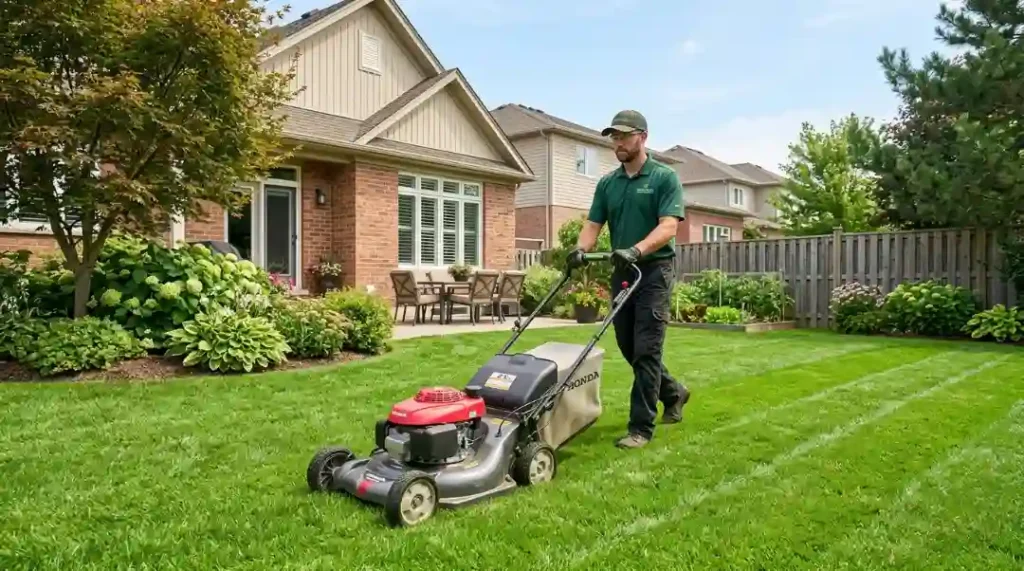
Picking the wrong lawn mower is like buying hiking boots for a flat city commute. It works, but it’s not right for the job. If you’ve been going back and forth on the self-propelled vs push mower debate, you’re not alone. Millions of homeowners face this exact question every spring, and the wrong choice costs them time, money, or both. Here’s the quick answer: A self-propelled mower is better for large, hilly, or uneven yards over 1/4 acre. A push mower is the smarter choice for small, flat lawns under 1/4 acre where budget and simplicity matter most. The rest of this article breaks down every difference so you can buy with confidence, not guesswork. What Is a Self-Propelled Mower? A self-propelled mower uses a built-in drive system to move itself forward. You guide it; the motor does the pushing. It’s powered by a gas engine or an electric motor (corded or battery-powered), and the drive system connects directly to the wheels. Most models let you control the speed through a lever or bail bar on the handlebar. Some high-end models even offer variable speed, which adjusts to your natural walking pace. If you have a bad back, knee problems, or a yard larger than a quarter acre, this type of mower changes the experience entirely. Types of Self-Propelled Drive Systems Not all self-propelled mowers are built the same. The drive type affects how well the mower performs on your specific yard. Front-Wheel Drive (FWD): Best for flat to slightly uneven lawns. Easier to steer around flower beds and obstacles. Less traction on steep slopes. Rear-Wheel Drive (RWD): Better grip on hills and slopes. The most popular choice for yards with any incline. All-Wheel Drive (AWD): Maximum traction on challenging, uneven, or wet terrain. Heavier and more expensive, but the most capable option overall. What Is a Push Mower? A push mower moves only when you push it. The engine (if it has one) powers the cutting blades, not the wheels. Your body provides forward motion. Push mowers are lighter, simpler, and cheaper than self-propelled models. They’re ideal for homeowners with small, flat yards who want a low-maintenance tool that gets the job done without extra complexity. Types of Push Mowers to Consider Manual Reel Mowers Zero emissions, completely quiet, and the cheapest option available. The blades spin as you push. Best for short, well-maintained grass on small lawns. Not suitable for tall or thick turf. Electric Push Mowers (Corded or Battery) Quieter than gas, produce no direct emissions, and require less maintenance. Battery-powered models (20V to 60V) are the most convenient for small to medium yards. Corded models are cheaper but limit your range. Gas-Powered Push Mowers More cutting power (125cc to 160cc engines) and no battery runtime concerns. Best for medium-sized, flat lawns with thicker grass. Noisier and produces exhaust, which is worth considering if you’re in a residential area. Self-Propelled vs Push Mower: Head-to-Head Comparison Feature Self-Propelled Push Mower Ease of Use Easier on large/hilly lawns Simple on small, flat lawns Speed 3 to 4 mph (consistent) Depends on your pace Engine Power (Gas) 140cc to 220cc 125cc to 160cc Battery Power 20V to 120V 20V to 60V Weight 45 to 110 lbs 35 to 65 lbs Cutting Width 18 to 33 inches 13 to 22 inches Fuel Efficiency Uses 10-25% more fuel Highly efficient Maintenance Higher (drive system upkeep) Lower (fewer parts) Average Cost $330 to $2,200 $130 to $800 Best For Large, hilly, or uneven yards Small, flat, obstacle-heavy yards Ease of Use Self-propelled mowers are easier to use on medium to large lawns, hilly terrain, and thick grass. Push mowers are simpler and more manageable on small, flat lawns with many tight corners or obstacles. With a self-propelled model, the drive system handles the hard work. You’re essentially steering, not fighting. On the other hand, a push mower puts 100% of the movement effort on you, which gets tiring fast on anything larger than 1/3 acre. Speed and Efficiency Self-propelled mowers hold a steady 3 to 4 mph, even on moderate inclines. That consistent pace produces a more even cut and gets the job done faster. Push mowers depend entirely on how fast and how long you can sustain a walking pace, which naturally slows down as fatigue sets in. Fuel Efficiency Push mowers win here. They use 10% to 25% less fuel than self-propelled models because the engine only powers the blades, not the wheels. If you’re mowing weekly and fuel costs matter to you, this adds up over a full season. Weight and Maneuverability Push mowers (35 to 65 lbs) are easier to lift, turn, and store than self-propelled models (45 to 110 lbs). If your yard has lots of garden beds, tight corners, or curbing, a push mower gives you faster response and more precise steering. Noise Level Gas-powered self-propelled mowers tend to be louder due to their larger engines. If you live in a suburban neighborhood with noise restrictions, an electric push mower or battery self-propelled mower is worth considering. Your neighbors will thank you. Maintenance Requirements This is where push mowers have a clear edge. Fewer moving parts means less that can break. Annual maintenance on a gas push mower involves an oil change, air filter replacement, spark plug check, and blade sharpening. That’s it. Self-propelled mowers need all of the above, plus drive belt inspections, drive cable adjustments, and drive gear lubrication. These repairs often require a trip to a service shop, not just a Saturday afternoon in the garage. Cost Comparison A basic push mower starts around $130. Premium models with electric start and wider decks run $600 to $800. Manual reel mowers cost as little as $60. Self-propelled mowers start around $330 and can exceed $2,200 for commercial-grade models. The higher price reflects the more powerful engine, stronger frame, and drive system hardware. Budget for repairs too. The drive system is the first thing to wear out. Mowing on Hills and Slopes: Which Is Safer?

Self-Propelled vs Push Mower: Which One Is Actually Worth Your Money? Read More »

Homeowner in gardening gloves inspecting a fire ant mound in a green backyard lawn

How to Get Rid of Fire Ants in Your Yard

Fire ants don’t just ruin your lawn. They make it unsafe to walk barefoot, play with pets, or enjoy your yard. If you’re searching for How to Get Rid of Fire Ants in Your Yard, you likely want something that works fast and keeps them from coming back. Here’s the quick answer. Kill the colony, not just the ants you see. Use bait treatments to reach the queen, then follow up with mound treatments and prevention steps. This guide breaks down exactly what to do, what to avoid, and how to get lasting results. What Are Fire Ants? Fire ants aren’t just regular ants with a bad attitude. They’re an invasive species with a biology designed for survival, and that’s exactly why getting rid of them takes more than stomping on a mound. Imported vs. Native Fire Ants The most problematic species is Solenopsis invicta, the red imported fire ant. It arrived in the U.S. accidentally through cargo ports and has since spread aggressively across the South. Native fire ants (Solenopsis geminata and Solenopsis xyloni) also exist but cause far less damage. How a Fire Ant Colony Works Every fire ant colony runs on a clear hierarchy. The queen lays all the eggs. Worker ants build tunnels, forage for food, and defend the colony. Larvae digest solid food and feed it back to the adults as liquid. This system matters when choosing a treatment  if the queen survives, the colony survives. How to Identify a Fire Ant Mound Fire ant mounds look like loose, irregular piles of dirt on the soil surface. They have no visible opening at the top. Entry and exit tunnels are underground, often extending 5 to 20 feet away from the mound. After rain, mounds rise noticeably as ants push soil upward to keep their nest dry. Why Fire Ants Are a Real Problem Fire ants aren’t just a backyard nuisance. They’re a genuine safety risk for your family, pets, and property. Fire ant stings cause immediate burning pain followed by itching pustules at the sting site. For people with allergies, a single sting can trigger anaphylactic shock, which can be fatal. Children and small animals stung repeatedly are especially vulnerable. Beyond stings, fire ants damage electrical equipment. They’re drawn to electrical currents and frequently build nests inside air conditioning units, junction boxes, and outdoor lighting. That’s a problem most homeowners don’t think about until it’s too late. Fire Ant Remedies That Don’t Work Before spending time and money on the wrong fix, let’s clear the air. These popular home remedies for fire ants either don’t kill the queen or cause more harm than good. Grits The idea is that fire ants eat grits, the moisture inside their bodies causes expansion, and they explode. It’s a satisfying image. It just doesn’t happen. Grits don’t kill fire ants  period. Boiling Water Pouring boiling water on a mound kills ants on contact. But it rarely reaches the queen’s chamber. The surviving colony simply moves a few feet away and rebuilds. You’ll also risk burning yourself and scalding surrounding grass. Diatomaceous Earth Diatomaceous earth damages insect exoskeletons and causes dehydration. It kills worker ants it physically contacts. But it can’t reach the queen deep underground, and rain washes it away quickly. Club Soda, Orange Peels, and Vinegar Does vinegar kill ants? It can repel them. But repelling isn’t the same as eliminating a colony. These options at best cause the colony to relocate slightly. They don’t kill the queen, which means the problem stays. Gasoline or Diesel Fuel This is dangerous, illegal in many areas, and damages your soil and surrounding plants. There’s no scenario where this is a good idea. How to Get Rid of Fire Ants in Your Yard: Methods That Actually Work Now let’s talk about what genuinely works. The most proven strategy is the two-step method, which combines broad prevention with targeted mound treatment. Step 1: Broadcast Bait Treatments (Your Best Starting Point) Broadcast bait is the most cost-effective and least labor-intensive way to reduce fire ants across your entire lawn. You spread granular bait over the whole yard, not just individual mounds  using a small hand-held spreader. Why this works: Worker ants pick up the bait granules and carry them back to the colony. The larvae eat the granules, liquefy the insecticide, and pass it throughout the colony until it reaches and kills the queen. Key products: Amdro Fire Ant Bait (hydramethylnon)  1 to 1.5 lb per acre Advion Fire Ant Bait (indoxacarb)  kills mounds in as little as one week Extinguish Plus (methoprene + hydramethylnon) combines a growth regulator with a contact kill Timing matters a lot. Apply bait when the ground is dry and soil temperatures are between 70 and 90°F. Avoid applying before rain; it spoils the bait before ants collect it. The best windows are early spring, midsummer, and early fall. Step 2: Individual Mound Treatments (For Problem Spots) After broadcasting bait, wait at least a few days before treating surviving mounds individually. This gives worker ants time to carry bait into the colonies first. Liquid Mound Drenches provide the fastest results. Mix the insecticide in water and pour 1 to 2 gallons directly over the mound. Pour about one-quarter of the liquid in a 10 to 12-inch ring around the outside first  this blocks the queen’s escape through underground tunnels. Then soak the mound directly. Top options for liquid drenches include: Bifenthrin (Hi-Yield Bug Blaster)  0.5 fl oz per gallon Permethrin (Bonide Eight Insect Control) Spinosad (Monterey Garden Insect Spray)  the organic-leaning option, though slower Dry Mound Treatments are easier to apply but slower. Sprinkle powder directly on and around the mound. Acephate (Ortho Orthene) is the most effective but has a strong odor. Deltamethrin and beta-cyfluthrin products work nearly as well without the smell. Get Rid of Fire Ants with Long-Lasting Lawn Treatments If you want season-long protection without repeated treatments, broadcast insecticide granules applied to the entire lawn are worth considering. Products containing bifenthrin, like Ortho

How to Get Rid of Fire Ants in Your Yard Read More »

Professional landscaper in green uniform mowing a neat suburban backyard lawn with a Honda mower — illustrating standard landscaping labor and hourly rate services

How Much Do Landscapers Charge Per Hour? (2026 Rates Guide)

Hiring a landscaper feels simple until you start getting quotes that are all over the place. One company says $50 an hour, another says $120, and suddenly you’re wondering what you’re actually paying for. If you’ve searched how much do landscapers charge per hour, you already know the answer isn’t one clean number and that’s exactly what this guide sorts out for you. Here’s the quick answer: most landscapers charge between $50 and $100 per hour for general work. Specialized services like landscape design or hardscaping can push that to $150 or more. Keep reading, because the real value is knowing why rates differ and how to make sure you’re getting fair pricing. Understanding Landscaping Services Not all landscaping is the same, and that’s the first thing to get clear on. A guy with a mower is priced differently than a certified landscape architect with a full crew. Landscaping breaks down into three broad categories: Basic Maintenance covers mowing, edging, weeding, and leaf removal. This is the most affordable category and the most common reason people hire hourly help. Garden and Planting Services include pruning shrubs, planting flowers or trees, mulching, and seasonal bed prep. These take more skill and cost more. Specialized Services cover irrigation installation or repair, hardscaping (patios, retaining walls, walkways), landscape design, and tree work. These require trained professionals and carry higher rates. Knowing which category your project falls into helps you set a realistic budget before the first call. Average Hourly Rate for Landscapers   Let’s get into the actual numbers. Below are the standard hourly rates across different service types in 2025. Service Type Hourly Rate (USD) Basic Lawn Maintenance $50 – $80 General Landscaping Labor $50 – $100 Planting & Garden Care $50 – $100 Irrigation Repair $75 – $125 Hardscaping Professionals $100 – $150+ Landscape Design Specialists $100 – $150+ Certified Landscape Architects $150 – $250+ One thing most homeowners miss: the hourly rate usually covers the crew, not a single person. A two-person team working for three hours at $75/hour means you’re paying $225 for six man-hours of total work. That’s actually good value when the math works in your favor. What Affects Landscaping Hourly Rates Landscaping hourly rates shift based on several real factors, not just the company’s preference. Understanding these helps you compare quotes fairly and spot when a bid is unreasonably high or suspiciously low. Yard Size and Terrain Bigger yards take more time. That’s the simple version. But terrain matters too — sloped lawns, tight corners, dense shade areas, and awkward layouts all add time to any job. A flat half-acre takes far less effort than a hilly quarter-acre with drainage issues. Project Complexity Simple tasks like mowing or leaf blowing sit at the lower end. The moment a job requires skill — diagnosing a drainage problem, repairing irrigation lines, or pruning mature trees — the rate goes up. Complexity always costs more, and it should. Experience and Crew Certification A newer landscaping company might charge $45/hour to win business. A crew with certified professionals, licensed equipment operators, and years of specialized training will charge $90–$120. You’re paying for reliability, not just labor. Geographic Location Urban markets consistently charge more. A landscaper in Los Angeles or New York operates with higher overhead  insurance, fuel, wages  than one in rural Kansas. Coastal cities and major metros typically run 30–50% above national averages for the same services. Season and Demand Spring and early summer are peak season. Demand is high, crews are booked, and rates reflect that. If your project isn’t urgent, scheduling in fall or early winter can save 10–20% on standard services. Equipment Requirements Basic lawn maintenance needs basic tools. Hardscaping or stump removal requires heavy equipment, and that operational cost gets built into your hourly rate. Always ask whether equipment fees are included or billed separately. Hourly vs. Flat Project Pricing Hourly pricing works best when the scope of a job is unclear or the tasks are likely to change. Flat pricing suits defined, measurable projects where the landscaper can accurately predict time and materials. Here’s a practical breakdown: Choose hourly when: You need seasonal cleanup and aren’t sure how much work is involved The project involves troubleshooting (drainage issues, diseased plants, pest damage) Your task list is flexible and may shift during the visit You want to pay only for actual time worked Choose flat rate when: The job is clearly defined (plant 8 bushes, lay 200 sq ft of sod) You want cost certainty before the work starts Materials and man-hours can be accurately calculated upfront It’s a larger project like patio installation or a full garden redesign Some landscapers use a hybrid model  flat rate for routine maintenance, hourly for anything outside the standard scope. That’s often the most practical setup for ongoing lawn care relationships. Pricing Structures and Payment Models Beyond hourly vs. flat rate, landscaping companies use a few different billing setups. Knowing these prevents surprises on your final invoice. One-Time Service: You pay per visit with no commitment. Rates are typically at the higher end since there’s no guaranteed repeat business for the contractor. Monthly Retainer / Maintenance Contract: You pay a fixed monthly fee for regular visits. This usually gets you a 10–25% discount on standard rates and priority scheduling during peak season. Annual Contract: The most cost-effective option for full-year lawn care. You lock in rates, get scheduled service, and often receive bundled discounts for multiple services. Per-Project Billing: Common for larger installs. The landscaper quotes a total cost based on estimated labor hours, materials, and equipment. Payments are often split into a deposit, mid-project payment, and final balance. Who Needs Hourly Landscaping Services Hourly landscaping isn’t just for people with sprawling estates. It’s a practical option for anyone who needs targeted help without committing to a large project. Seasonal Cleanup: Post-winter debris removal, leaf clearing, and pre-summer prep are classic hourly jobs. The work varies year to year, so hourly billing makes more sense than a

How Much Do Landscapers Charge Per Hour? (2026 Rates Guide) Read More »

Wood chip mulch placed close to a home foundation does mulch attract termites when it touches the base of your house

Does Mulch Attract Termites? What Every Homeowner Should Know

You’re not the only one who has put down a new layer of mulch in your garden and then worried if you just made it easier for termites to get in. Homeowners ask this question a lot, and the answer is more complicated than just yes or no. Does mulch attract termites? Not precisely, but it can make it easier for them to get closer to your house. The quick answer is that mulch itself doesn’t produce termites, but some kinds can hold on to moisture and heat that termites like. The good news is that you can keep your yard looking nice while also protecting your property by choosing the correct mulch and putting it in the right position. This post talks about everything from the sorts of mulch that are most likely to attract termites to what you can do right now to keep them away. What Is Mulch and Why Do Homeowners Use It? Any substance applied to soil to protect it, hold onto moisture, and manage weeds is called mulch. It can be broadly classified as either organic (wood chips, bark, straw, compost) or inorganic (rubber, gravel, rocks). There are good reasons why homeowners use landscape mulch. It lowers the frequency of watering, maintains stable soil temperatures, and gives garden beds a polished appearance. The USDA Forest Service claims that mulched plants and trees exhibit quantifiably better soil health and growth than bare soil. The issue? The conditions that termites naturally seek out can be replicated by organic mulch, particularly wood-based varieties. Does Mulch Around the House Cause Termites? To directly answer the central query: If termites aren’t already in your soil, applying landscape mulch won’t make them appear. These insects do not appear on their own because you added wood chips; instead, they live in intricate underground colonies. Additionally, it is extremely unlikely that store-bought bags of wood mulch will bring live pests into your yard. Insects are physically destroyed during the commercial shredding and chipping process, and any lone survivors are unable to start a new colony without a subterranean queen. Environmental modification is the true problem. Although you aren’t producing a significant food source when you stack wood chips directly against your siding, you are creating the perfect microclimate. Workers underground are particularly vulnerable to desiccation, or drying out. The top few inches of soil are a safe place for pests to feed without losing essential body humidity due to the moisture-trapping qualities that make wood chips ideal for your shrubs. The Connection Between Termites and Mulch Termites feed on cellulose, the fibrous material found in wood, paper, cardboard, and other organic matter. Wood-based mulch does contain cellulose, but it’s not a high-quality food source compared to solid structural wood. What termites want from mulch isn’t really the food. It’s the shelter and the moisture. A thick, damp layer of bark or wood chip mulch acts like a protective barrier that shields termites from sunlight and keeps the ground beneath it moist. Sunlight kills termites, so anything that blocks it works in their favor. Why Termites Like Mulch These underground pests are constantly foraging blindly through the soil looking for two things: moisture and cellulose. While solid structural lumber or dead tree roots are their preferred sources of cellulose, a damp garden bed provides the perfect highway. [ Top Layer: Dry Wood Chips ] –> Provides shade & insulation [ Middle Layer: Damp Soil Base ] –> High humidity zone for worker survival [ Bottom Layer: Structural Wood ] –> Easy path to foundation if contact exists The Moisture Factor: Workers require nearly 100% humidity to survive outside their deep underground nests. A thick layer of wood chips shields the soil from the sun, keeping the ground permanently damp. Thermal Insulation: In peak summer heat or winter cold, organic ground covers insulate the soil, allowing pests to forage near the surface for longer periods during the year. Physical Cover: A heavy blanket of wood chips hides the mud tubes that workers build to travel safely, allowing them to reach your home’s siding completely unseen. Mulch vs. Termites: Quick Comparison Table Mulch Type Termite Risk Level Moisture Retention Best For Pine bark Medium Medium Flower beds Wood chips High High Tree bases Cedar mulch Low Medium Foundation beds Cypress mulch Low-Medium Medium General landscaping Rubber mulch Very Low Low Playgrounds, paths Gravel/rocks Minimal Low Driveways, borders Compost mulch Medium High Vegetable gardens Straw Low Low-Medium Seasonal/garden use What Types of Mulch Attract Termites the Most? Will wood mulch attract termites more than other types? Yes, and it’s not close. Fresh wood chips and shredded hardwood bark are the highest-risk options because they hold moisture, offer cellulose food, and pack densely enough to hide termite activity. Pine bark mulch is moderate risk. It decomposes faster than hardwood and offers less structural feeding opportunity, but it still holds moisture against a foundation. Fresh wood chips from tree trimmings or utility companies are the riskiest option. They’re often green, full of moisture, and densely packed. Compost mulch sits in a gray area. It’s mostly decomposed organic matter, which termites find less appealing than solid wood. But if it’s applied thick and wet near the foundation, the moisture alone can draw them in. Rubber mulch made from recycled tires has almost zero termite appeal since it’s not cellulose-based. However, it does retain heat and moisture underneath, which can still create favorable conditions for insects. What’s the Best Mulch to Use to Avoid Termites? If termite-resistant mulch is your goal, a few options stand out. Cedar mulch is the most widely cited termite-resistant option. The natural oils in cedar wood (specifically thujopsene) act as a mild repellent to termites and some other insects. It’s not a guarantee, but it’s a meaningful deterrent. This is the closest thing to termite proof mulch in the organic category. Cypress mulch (heartwood, not sapwood) also contains natural compounds that termites dislike. The issue is that much of the “cypress mulch” on the

Does Mulch Attract Termites? What Every Homeowner Should Know Read More »

Should You Water Your Lawn After Mowing homeowner mowing green lawn with sprinkler running in morning light

Should You Water Your Lawn After Mowing? (The Complete Guide)

Watering your lawn right after you finish mowing is generally unnecessary, but it’s safe if your soil is already dry or due for its scheduled irrigation. Freshly cut grass faces immediate moisture loss through its newly sliced tips, making a drink helpful under drought conditions. However, adding water to a lawn that doesn’t need it invites fungal disease and shallow roots. The true secret to a perfect lawn lies in separating your irrigation schedule from your mowing routine. Instead of treating watering as an automatic post-mow step, you must look at specific soil conditions and weather signals. Let’s look at exactly how to time your irrigation to keep your grass thick, resilient, and green. Signs You Should Water Your Lawn After Mowing Your turf will tell you when it needs moisture after a fresh cut. Look for structural and color visual changes in the grass blades. Lingering Footprints: Walk across your yard and look back. If your footprints remain flattened in the grass instead of bouncing back within a few seconds, the plant cells lack the water pressure to stand upright. Color Shifts: Dehydrated turf loses its bright green hue. Look for dull, grayish-blue tints or slight yellowing across the surface. Curled or Withered Blades: Examine individual grass stalks closely. Thirsty blades fold or roll inward along their lengths to reduce their surface area and conserve water. Hard, Fractured Soil: Check the soil surface between grass clumps. If you spot surface cracking or the ground feels like concrete underfoot, your root zone is dry. Why You Should Never Mow Right After Watering Mowing a lawn that you just watered is a recipe for a damaged yard and ruined equipment. Wet grass blades bend easily under the weight of a mower instead of standing upright. Shredded Grass Tips When your mower blade hits pliable, wet grass, it rips and shreds the tissue rather than slicing it cleanly. These jagged, torn edges turn brown within 24 hours, making your entire yard look scorched and dull. Soil Compaction Risks Heavy residential and commercial mowers press deep into muddy, saturated soil. This crushing weight squeezes the tiny air pockets out of your soil structure, which suffocates grass roots and stops healthy nutrient flow. Benefits of Watering After Mowing While not always mandatory, strategic post-mow irrigation offers real physiological perks when your soil is dry. Every cut creates thousands of open microscopic wounds across your yard. Immediate Stress Alleviation Mowing forces grass out of its normal growth state. Providing deep moisture right after cutting allows the root system to pump water up to the open wounds, which stabilizes internal fluid pressure and speeds up recovery. Washing Down Fertilizer and Amendments If you plan to apply a light topical treatment or organic fertilizer after cutting, a post-mow watering is perfect. The water washes the nutrients off the grass blades and down into the soil, preventing foliar burn and activating the product. Benefits of Watering After Mowing Watering after mowing isn’t just acceptable, it actively helps your lawn recover and grow stronger. Rehydration and Stress Relief Mowing removes a portion of each grass blade. That’s physical stress on the plant. Watering shortly after gives the grass the moisture it needs to bounce back faster and resume normal growth. Better Nutrient Absorption Water carries nutrients deeper into the root zone. After mowing, the soil is slightly more open to absorption. Watering at this point helps fertilizers and natural nutrients reach where roots need them most. Cooling Effect On hot summer days, freshly cut grass heats up quickly without its full blade length. A good watering cools the surface temperature and reduces the chance of heat stress turning your lawn brown. Weed Seed Disruption Watering right after mowing can wash away weed seeds that were disturbed during cutting. It won’t eliminate weeds, but it reduces the chances of new ones germinating in exposed soil patches. Why Dry Grass Mowing Produces Cleaner Results Cutting your lawn when the turf is bone-dry ensures a crisp look and protects your equipment. Dry grass stands up straight and separate, allowing your mower blade to slice each stem at an even height. Uniform Cutting Height Dry grass resists the wind energy created by the spinning blade, which keeps it from flattening out during a pass. This results in a completely level surface across your whole landscape. Seamless Clipping Dispersal Dry clippings scatter evenly across the yard without clumping together. They slip down past the top of the grass canopy to decompose naturally, acting as a free nutrient boost for your soil. The Best Times of Day to Mow and Water Activity Ideal Time Window Why It Works Lawn Mowing 8:00 AM – 10:00 AM or 4:00 PM – 6:00 PM Avoids the intense midday heat while ensuring morning dew has evaporated completely. Lawn Watering 4:00 AM – 8:00 AM Low wind and minimal sun reduce evaporation, letting water soak deep into the root zone. The Morning Mowing Sweet Spot The absolute best window to run your mower is mid-morning. The rising sun has already dried the heavy morning dew, but the temperature remains cool enough to prevent heat stress on both you and your freshly cut turf. The Late Afternoon Alternative If morning doesn’t work, aim for the late afternoon before dusk. The sun’s intensity is fading, giving your grass a long, cool night to heal its cut tips before facing the next day’s heat. What Happens If You Water Before Mowing? Watering right before you step out with your mower causes a cascade of maintenance headaches. Saturated grass forms a dense, sticky mat when cut. Clogged Mower Decks Wet clippings stick to the underside of your mower deck like wet cement. This buildup chokes the airflow inside the machine, stalls your engine, and drops thick, slimy clumps of grass all over your clean lawn. Fungal Disease Transmission Damp, torn grass blades are highly vulnerable to fungal spores. Walking and rolling heavy machinery through a wet, freshly cut lawn spreads pathogens like brown

Should You Water Your Lawn After Mowing? (The Complete Guide) Read More »

Sharpening lawn mower blades with tools on a workbench, showing how often should you sharpen lawn mower blades.

How Often Should You Sharpen Lawn Mower Blades?

Most people mow their lawn on a schedule. Almost nobody sharpens their mower blade on one. That’s exactly where the problem starts. A dull blade doesn’t cut grass; it tears it. And torn grass turns brown, invites disease, and makes your lawn look worse after mowing than it did before. So before you fire up the mower again, it’s worth asking: when did you last sharpen that blade? So, how often should you sharpen lawn mower blades? The general rule is to sharpen after every 20 to 25 hours of mowing time. For most homeowners mowing a standard-sized lawn weekly, that works out to once or twice per mowing season. If your lawn is large, rocky, or full of roots and debris, you’ll need to sharpen more often. When to Sharpen Mower Blades Mowing frequency and yard conditions dictate your maintenance schedule more than calendar dates. If you spend 45 minutes cutting the grass each weekend, you hit the 20-hour mark after roughly 27 cuts. For a standard home in a temperate region, this means a baseline routine of sharpening once in early spring before the first cut and once again in mid-summer around July. Southern lawns features tough, dense warm-season turf varieties like Bermuda, St. Augustine, or Zoysia. These grasses possess high silica content, acting like fine sandpaper against cutting edges. Properties with loose, sandy topsoil throw up abrasive grit into the cutting deck during operation, dulling the metal much faster than clay or loam soils. Under these conditions, drop your maintenance interval to every 15 hours to maintain a pristine aesthetic. 5 Signs Your Mower Blades Need Sharpening Not everyone tracks mowing hours. That’s fine. The lawn itself will tell you when the blade is dull if you know what to look for. 1. Torn or Ragged Grass Tips When a blade is sharp, it slices through grass cleanly. When it’s dull, it tears. After mowing, crouch down and look at the tops of the grass blades. If the tips look frayed or brown after a day or two, that’s tearing, not cutting. Clean cuts heal faster and stay green longer. 2. Uneven Cutting Height A dull blade doesn’t just cut poorly. It can cause uneven cutting across the deck. Some sections look shorter than others despite no change in deck height. If you’re seeing stripes of taller grass that the mower should have caught, inspect the blade before assuming it’s a deck issue. 3. Grass Being Pulled, Not Cut You may feel or hear the mower working harder than normal. A dull blade creates more friction, which strains the engine and actually pulls at grass roots rather than slicing the stem. Over time, this stresses the grass and can thin out your lawn. 4. Dents, Chips, or Visible Nicks on the Blade Take the blade off and look at the cutting edge under natural light. Even small nicks or flat spots affect performance. A blade with visible dents along the cutting edge is past the “just sharpen it” stage. 5. Increased Mowing Time If it’s taking more passes to get the same result, or the lawn still looks rough after a fresh cut, that’s a performance signal. A sharp blade does more work per pass. A dull one makes you do the work twice. When to Replace Mower Blades Instead of Sharpening Sharpening has limits. There are cases where a replacement is the right move, not a sharper edge on a compromised blade. Replace a mower blade when it’s cracked, bent, heavily chipped, or worn past its minimum thickness. A blade that’s too thin is structurally unsafe. Sharpening a damaged blade just creates a sharp, dangerous one. Here’s when to skip sharpening and go straight to replacement: The blade has a visible crack or fracture, even a small one The blade is noticeably bent (place it on a flat surface to check) The sail height (the angled part that creates lift) is worn down significantly The blade has been sharpened so many times it’s now noticeably thinner than a new blade You hit a large rock or hard object at full speed and heard a sharp metallic impact Most blades last 1 to 2 seasons of regular use before they need replacement. Higher-quality blades (think hardened steel vs. standard steel) can go longer but still have limits. Why Sharp Lawn Mower Blades Matter A sharp blade isn’t just about aesthetics. It directly affects the health of your lawn in ways most people don’t consider. Sharp blades make clean cuts that allow grass to heal quickly. Dull blades tear grass, which creates jagged wounds that brown at the tips, become entry points for fungal infections, and weaken the plant over time. Grass cut cleanly by a sharp blade recovers faster, stays greener, and resists drought stress better. Think of it like this: if you need stitches and the doctor uses a dull scalpel, the wound takes longer to close and has a higher risk of infection. Grass works the same way. A clean cut is a fast-healing cut. There’s also an efficiency argument. A dull blade makes the engine work harder, which burns more fuel in a gas mower and drains batteries faster in a battery-powered one. Over a season, that adds up in both cost and wear on the motor. Do New Lawn Mower Blades Need to Be Sharpened? Do brand new lawn mower blades need to be sharpened before their first use? No, new lawn mower blades do not require sharpening because manufacturers ship them with a milled edge coated in a thick layer of paint or powder coating designed to prevent rust during shipping and storage. Many homeowners mistake this protective finish for dullness. The factory edge is intentionally left slightly blunt—roughly the thickness of a butter knife—because a razor-sharp edge would chip, roll, or dull within the first ten minutes of hitting thick grass and soil. Install them straight out of the box without grinding. Safety Precautions for Blade Sharpening Working with heavy

How Often Should You Sharpen Lawn Mower Blades? Read More »

Landscaping project showing river rocks spread with wheelbarrows, explaining how much is a yard of river rock

How Much Is a Yard of River Rock? (2026 Pricing Guide)

You’re not alone if you’ve ever stood in your yard wondering how much is a yard of river rock and whether it’s really worth the cost.  Most people who own homes agree on one thing: landscaping rocks look great, but the prices can be hard to understand. The right choice for your home isn’t just the sticker price; it’s also how you plan to use it, how much coverage you need, and how much value it will have in the long run. I promise to explain river rock prices in simple terms and give you real numbers you can trust in this guide. You’ll find out how much a yard of river rock costs on average, how much coverage you get, how much it costs to deliver and install it, and how to save money. At the end, you’ll know exactly how much river rock you need for your yard and how to plan for it with confidence. Average Cost of River Rock Per Cubic Yard in 2026 River rock costs $50 to $160 per cubic yard for bulk material, with a national average of around $85 per cubic yard. Standard mixed-color or gray river rock sits at the lower end. Specialty options like black river rock, Mexican beach pebbles, or polished varieties push costs toward the upper end or beyond. Here’s a quick breakdown by rock type and color: Rock Type Cost Per Cubic Yard Standard gray/brown river rock $50 – $90 Mixed-color river rock $60 – $100 Black river rock $90 – $140 White river rock $100 – $160 Mexican beach pebbles $150 – $300+ Polished river rock $100 – $200 Large decorative boulders $200 – $600+ A few factors push prices higher or lower: Rock size matters a lot. Small pebbles (under 1 inch) and large rocks (6+ inches) both cost more than medium-sized river rock in the 1–3 inch range, which is the most common and cheapest to source. Color and rarity drive specialty pricing. Colorado rainbow rock, Tennessee river rock, and Cherokee varieties are pricier than standard grey or brown options because sourcing and transportation add cost. Location affects what you pay. If you’re near a quarry or regional stone supplier, you’ll pay less. Remote areas can tack on significant shipping premiums. Quantity discounts apply above 10 cubic yards. Most bulk suppliers cut 10–20% off per-yard pricing for large orders. River Rock Cost Per Yard vs Per Ton (Which Is Cheaper?) Neither pricing method is inherently cheaper they’re just two ways to measure the same material. One cubic yard of river rock weighs roughly 2,400 to 2,700 lbs (about 1.2 to 1.35 tons). So a $85/yard rock might cost around $65 per ton, and both figures describe the same pile of stone. Most landscape suppliers in the U.S. sell river rock by either the ton or the cubic yard, and some use both. Here’s how to convert between them: 1 cubic yard = approximately 1.3 tons of standard river rock 1 ton = approximately 0.75 cubic yards When comparing quotes from two different suppliers, always convert to the same unit. A supplier quoting $75/ton may sound cheaper than one quoting $85/yard, but once converted, the $75/ton supplier actually costs more ($97.50 per equivalent cubic yard). For smaller stones like pea gravel, a cubic yard is lighter, so the ton price appears lower. For large decorative rocks or dense basalt, the weight per cubic yard is higher, which makes ton pricing look more expensive. Always check the weight density before comparing quotes. How Much Area Does One Yard of River Rock Cover? One cubic yard of river rock covers 75 to 170 square feet, depending on the depth you apply it. At a standard 2-inch depth, expect coverage around 150–170 sq ft. At 3 inches deep, coverage drops to around 100–110 sq ft. At 4 inches deep, a single yard covers roughly 75–85 sq ft. Here’s a practical reference table: Depth Coverage Per Cubic Yard 1 inch 300+ sq ft 2 inches 150 – 170 sq ft 3 inches 100 – 110 sq ft 4 inches 75 – 85 sq ft For most decorative landscape beds and garden borders, 2–3 inches is the standard. Dry creek beds and drainage areas typically need 4–6 inches, which uses significantly more material. A few guidelines based on project type: Pathways and walkways: 2 inches is fine for light foot traffic Decorative garden beds: 3 inches for weed suppression and visual effect Drainage and erosion control: 4–6 inches for functional performance River rock fireplace surrounds or focal points: 1–2 inches is usually decorative only One thing to keep in mind: rock compresses and settles over time. Order 10–15% more than your calculation suggests to account for natural settling and edge spillage. Why Rock Depth (2 inch, 3 inch, 4 inch) Matters At Robert’s Complete Care, we always recommend a minimum of 3 inches for river rock. Because these stones are rounded, they don’t “lock” together like crushed gravel. A 3-inch layer ensures that when the stones shift, you still have total coverage over your soil or weed barrier. How to Calculate Landscape Rock Needs To find your required cubic yards, multiply your total square footage by your target depth in inches, then divide that number by 324. This classic construction formula converts three distinct measurements into one straightforward volume requirement for ordering. Let’s break the process down into actionable steps: Step 1: Measure the length and width of your project area in feet. Step 2: Multiply length by width to find the total square footage. Step 3: Multiply your square footage by the desired depth in inches. Step 4: Divide that final number by 324 to get the exact cubic yards needed. For a practical example, imagine you want to build a long garden border that measures 50 feet long and 4 feet wide. That gives you an area of 200 square feet. If you want a solid 3-inch deep layer of stone to keep weeds away, your calculation

How Much Is a Yard of River Rock? (2026 Pricing Guide) Read More »

Fixing overwatered plants by repotting houseplants with soggy soil on a wooden table near a bright window

How to Fix Overwatered Plants?

Most plant deaths aren’t from neglect. They’re from too much love, specifically too much water. If your plant’s leaves are turning yellow, the soil feels soggy days after watering, or it’s just looking sad despite your best efforts, overwatering is likely the problem. Knowing how to fix overwatered plants can mean the difference between saving your green friend and losing it entirely. Here’s the quick answer: Stop watering immediately, move the plant to a dry spot with indirect light, remove it from its pot to inspect the roots, trim any rotted ones, and repot in fresh dry soil. Recovery takes anywhere from a few days to several weeks depending on how far the damage has gone. Keep reading, because the full process matters more than most guides let on. Can You Overwater Plants? Yes, you absolutely can overwater plants, and it’s one of the most common mistakes both beginners and experienced gardeners make. When soil stays waterlogged, roots can’t access oxygen, which causes them to suffocate and begin to decay. This creates a chain reaction that affects the entire plant from the roots up. Plants need a balance of water and air in the soil. Think of it like breathing underwater; no matter how much you need water, you still need air. Overwatering fills all the air pockets in the soil with water, leaving roots in an oxygen-free zone. Different plants have very different water needs. Succulents and cacti store water in their leaves, so they can go weeks between waterings. Tropical plants like pothos or peace lilies prefer more consistent moisture but still need soil to partially dry between sessions. How to Tell If Plants Are Overwatered Knowing what an overwatered plant looks like can help you catch the problem early. Here are the telltale signs of overwatered plants: Visual Symptoms The first symptom of trouble is usually yellow or brown leaves. Leaves from plants that have been overwatered feel soft and may even become slimy, unlike the crispy, dry leaves of plants that have been underwatered. Many people who own plants think their plants need more water when they see them wilting, even while the soil is wet. Edema looks like little lumps on leaves that are like blisters. This happens when the roots take in water more quickly than the plant can use it, which makes cells explode. The leaves may also get brown or black patches that spread over the leaves. Root and Soil Indicators The finger test is your best friend here. Stick your finger about two inches into the soil. If it feels wet or muddy, you’re overwatering. Healthy soil should feel slightly moist but never soggy. When you check the roots (if possible), healthy ones should be white or light tan and firm. Mushy or brown roots are a dead giveaway of overwatering and potential root rot. They may also give off a rotten, unpleasant smell. Other Warning Signs Fungus gnats, those tiny flying insects around your plant love damp conditions. If you see them hovering near the soil surface, it’s a sign the soil is staying too wet. Green algae or mold growing on the soil surface is another red flag that screams overwatering. How to Bring a Plant Back to Life After Overwatering The best way to fix overwatered plants is to act quickly. The longer a plant sits in wet, oxygen-deprived soil, the more root damage accumulates. Early action significantly improves recovery odds. Follow these steps: Step 1: Stop watering right away. Don’t water again until the soil dries out properly. This sounds obvious, but many people keep watering a wilting plant thinking it needs more. Step 2: Move the plant. Place it somewhere with bright, indirect light and good airflow. Avoid direct sunlight, which can stress an already-weakened plant. Step 3: Remove the plant from its pot. Gently tip the plant out and shake off as much soggy soil as you can. Let the root ball sit on newspaper or dry paper towels for 30 to 60 minutes to absorb extra moisture. Step 4: Inspect and trim the roots. Look for dark, mushy roots. Cut them off using clean scissors or pruning shears. Leave only the healthy, white, firm roots intact. Wipe your tools with rubbing alcohol between cuts to avoid spreading any fungal infection. Step 5: Treat with a fungicide if needed. If you see signs of root rot, dust the remaining roots lightly with powdered cinnamon or apply a diluted hydrogen peroxide solution (1 part hydrogen peroxide to 3 parts water) before repotting. Cinnamon acts as a natural antifungal. Step 6: Repot in fresh, dry soil. Use a well-draining potting mix appropriate for your plant type. Make sure the new pot has drainage holes at the bottom. Step 7: Water lightly once, then wait. Give the plant just enough water to settle the soil around the roots. Then wait until the top inch of soil is dry before watering again. Proper Watering Techniques for Yellowing Plants If your plant’s leaves are turning yellow from overwatering, the priority is to fix the drainage and watering schedule, not to add fertilizer or change light conditions. Yellow leaves caused by overwatering won’t recover once damaged, but new healthy growth will appear once the root system is stable. Here are practical watering habits that prevent the problem from returning: Use the finger test. Push your finger about one inch into the soil. If it feels moist, don’t water. If it feels dry, it’s time. Water deeply, but less often. When you do water, water thoroughly so it drains out the bottom of the pot. Shallow, frequent watering keeps the soil surface wet and roots shallow. Check drainage every time. Empty the saucer under the pot within 30 minutes of watering. Standing water in the saucer causes the same problems as soggy soil. Match watering to the season. Most plants need significantly less water in winter when their growth slows. Watering on a rigid weekly schedule ignores this completely. Overwatering vs

How to Fix Overwatered Plants? Read More »

How to trim bushes using hedge shears for clean and healthy shrub shaping

How to Trim Bushes: A Complete Homeowner’s Guide

Most homeowners look at overgrown bushes and feel stuck. Not because they don’t care, but because nobody ever showed them the right way to do it. Trimming bushes isn’t complicated, but doing it wrong can damage your plants, invite disease, or leave your yard looking worse than before. This guide covers exactly how to trim bushes the right way  the tools, the timing, the technique, and the mistakes that’ll cost you. Whether you’re dealing with a flowering shrub, a boxwood hedge, or a sprawling palm, you’ll find what you need here. Why do you need to cut back bushes? Think of trimming bushes like getting a haircut for your plants. Just as regular trims keep your hair healthy and styled, trimming bushes serves several important purposes that go beyond aesthetics. Promotes Healthy Growth Trimming shrubs on a regular basis makes them stronger. When you cut off dead or broken branches, the plant may put all of its energy into creating new, healthy growth. Those aged, dying branches are like energy vampires; they consume nutrition but don’t give anything back. You’re giving your bushes a new start by clipping them off. Prevents Disease and Pest Problems Pests and diseases love to hide in shrubs that are too big. Branches that are thick and twisted hold in moisture and block air flow, which makes it easier for fungi and insects to grow. Regular trimming makes the plant’s canopy more open, which lets air and light reach all regions of the bush. This little thing to perform can help you avoid having to pay for pest control later on. Maintains the Desired Shape and Size Bushes don’t develop in perfect shapes on their own. If you don’t trim them regularly, they can get too big, uneven, or block windows and walkways. Strategic pruning lets you control the size and shape of your bushes so that they fit precisely into your landscape design without getting in the way of other plants or structures. Before You Start: Important Things to Know The best time to trim most bushes is late winter or early spring, just before new growth begins. This gives plants time to recover and produce strong new shoots during the growing season. That said, timing depends on the type of plant. Flowering shrubs like azaleas or lilacs should be trimmed right after they bloom  trimming before flowering removes the buds you’re waiting on. A few things to check before you pick up any tool: Know your plant type. Evergreen shrubs, deciduous shrubs, flowering shrubs, and palm trees each have different trimming needs. Check local regulations. Some neighborhoods and HOAs have rules about hedge heights and timing. Look for bird nests. From spring through summer, always inspect bushes for active nests before trimming. In most areas, disturbing an active nest is illegal. Tools You’ll Need for Bush and Palm Trimming Using the right tool makes the job faster and cleaner. Using the wrong one causes ragged cuts that invite disease. Hand pruning shears are best for stems under ¾ inch thick. They give you precision, especially on flowering plants or ornamental shrubs. Look for bypass pruners over anvil-style they make cleaner cuts. Loppers handle thicker branches between ¾ inch and 1.5 inches. The long handles give you leverage without straining your wrists or hands. Hedge trimmers (electric or gas-powered) are the right call for shaping large hedges or keeping long rows of shrubs uniform. Electric models are quieter and easier to control for most homeowners. A pruning saw is what you reach for when branches are over 1.5 inches thick. Don’t try to force loppers through wood that’s too thick  it damages both the tool and the plant. Also keep these on hand: Safety glasses and gloves A bucket or tarp for clippings Rubbing alcohol or a diluted bleach solution to clean your blades between plants Cleaning your blades matters more than most people realize. Moving from one plant to another with dirty tools is one of the fastest ways to spread fungal disease through a garden. How to Trim Bushes and Hedges Correctly Trimming bushes correctly means starting with dead or damaged wood, then shaping the outside growth. Always cut at a slight angle, just above a bud or branch junction, and never remove more than one-third of the plant in a single session. Here’s the step-by-step process: Step 1: Remove dead, diseased, or crossing branches first. Start from inside the plant and work outward. Dead wood is easy to spot  it’s dry, brittle, and has no green beneath the bark. Crossing branches rub against each other, creating wounds that let disease in. Step 2: Open up the center. Removing a few inner branches improves airflow and light penetration. This is especially important for dense shrubs like boxwood or privet. Step 3: Shape the outer growth. Now trim the outside to the shape you want. Work in sections. Step back often to check your progress  it’s much easier to take more off than to fix an uneven cut. Step 4: Cut at the right angle. Always cut at a 45-degree angle, slanting away from the nearest bud. This lets water run off and reduces the risk of rot forming at the cut point. Step 5: Clean up as you go. Remove clippings from around the base of the plant. Leaving debris on the ground can harbor pests and disease over winter. How to Shape Bushes for a Clean Look The most common shaping styles are flat-top, rounded, and tapered. Each has its place, but there’s one rule that applies to all of them: keep the base slightly wider than the top. This isn’t just about aesthetics. A bush that’s wider at the top than the bottom will shade its own lower branches, causing them to thin out and die. A slightly tapered shape lets sunlight reach the entire plant. For formal hedges, a string line stretched between two stakes at your target height helps you cut a perfectly level top. It’s a

How to Trim Bushes: A Complete Homeowner’s Guide Read More »

Woman planning how to design a garden using layout drawings, plants, and tools in a backyard setting

How to Design a Garden? A Complete Beginner’s Guide

Have you ever dreamed your yard could be more than just grass and dirt? You could have imagined lovely flowers, comfortable places to sit, or fresh veggies blooming just outside your door. Anyone can make a beautiful outdoor environment with the correct planning and understanding. Designing a garden isn’t just for professional landscapers. Learning how to design a garden gives you a lot of options, whether you have a small balcony or a big backyard. This guide will help you make a garden that is both beautiful and useful by teaching you everything from how to understand your space to how to choose the right plants. Let’s get started and find out how to turn your outdoor space into the garden of your dreams. Learn About Your Garden Space   You need to be a detective in your own yard before you plant any seeds or acquire any supplies. Getting to know your garden space is like getting to know a new friend: the more you learn, the better your connection will be. Learning about Garden Zones and Microclimates Microclimates give your garden its unique identity. These are little spots in your yard where the weather is a little different from the rest of the yard. For instance, the sunny place on your south-facing wall stays warmer and drier than the gloomy spot under your big oak tree. Based on temperature, garden zones advise you which plants will grow well in your location. The USDA Plant Hardiness Zone Map splits the country into distinct zones. Knowing which one you’re in will help you choose plants that will not only survive but also do well. It takes less than a minute to determine your zone by searching online using your zip code. Tracking the Sun and Garden Aspect The garden aspect is a fancy way of saying which way your garden faces. This is important since it changes how much sun your plants get. Spend a day monitoring how the sun moves around your yard. Write down which areas get: Full sun means at least six hours of direct sunshine. Partially sunny (3 to 6 hours) Less than 3 hours of shade The sun in the morning is softer than the sun in the afternoon, which is important for fragile plants. Take pictures all day or draw a simple map that shows where the sun and shade are. When you pick plants later, this information will be very helpful. Great Gardening Advice for FREE Want to hear a secret? You don’t have to do everything by yourself. Your local Cooperative Extension office can help you with gardening questions that are relevant to your area. These professionals know your soil, weather, and the pests that are a problem in your area. You can also join local gardening clubs or online groups where more experienced gardeners talk about what worked and what didn’t for them. People who have already made the mistakes you’re destined to make can sometimes teach you the best lessons. You can see how your space will look before you spend any money with free online tools like garden planning applications. A lot of them let you drag and drop plants into a virtual garden to see how they will look when they are fully grown. How to Design a Garden From Scratch   Designing a garden from scratch means starting with observation, not shovels. Before buying a single plant, spend time watching your outdoor space. Note where the sun hits, where water pools after rain, and which areas stay shaded. This single habit saves most beginners from expensive mistakes. The most common error? Planting first and planning second. Gardens designed this way end up patchy, unbalanced, and hard to maintain. Start by sketching a rough layout on paper. It doesn’t need to be precise. Just mark your boundaries, structures (fences, walls, sheds), and any existing plants or trees. This becomes your working map. Garden Design Basics Every Beginner Should Know Good garden design isn’t about making things look fancy. It’s about creating a space that’s functional, easy to manage, and enjoyable to spend time in. Here are the core principles worth keeping in mind: Balance means your garden feels visually even, not necessarily symmetrical. A large tree on one side might balance with a dense planting bed on the other. Scale matters more than most beginners realize. A tiny water feature in a large garden looks lost. A towering shrub in a small courtyard feels suffocating. Focal points give the eye somewhere to land. A statement tree, a garden bench, or a raised bed can all serve as anchors that pull the design together. Repetition creates rhythm. Using the same plant or material in two or three spots ties a garden together without looking boring. Before You Start: Make a Wishlist Sit down and write out what you actually want from your garden. This sounds simple, but most people skip it. Ask yourself: Do you want a space to relax in? Grow vegetables? Create privacy from neighbours? A garden for children to play in? These goals shape every decision that follows. Be realistic about how much time you’ll spend maintaining it. A wildflower meadow is low-effort once established. Formal hedging requires regular trimming. A vegetable plot needs consistent attention from spring to autumn. Consider the Soil Soil is the foundation everything grows in, and yet most beginners ignore it completely. Good garden design always accounts for soil type because it determines which plants will thrive and which will struggle. Sandy soil drains fast but loses nutrients quickly. Clay soil holds water and nutrients but can become waterlogged. Loamy soil is the ideal middle ground. Buy a basic soil testing kit (around £10 to £15 from most garden centres) to check your pH level. Most plants prefer a pH between 6.0 and 7.0. Acid-loving plants like rhododendrons and blueberries need a lower pH, while lavender and most vegetables prefer neutral to slightly alkaline conditions. If your soil is poor,

How to Design a Garden? A Complete Beginner’s Guide Read More »