Your driveway takes a beating every single day. Cracked concrete and worn asphalt don’t just look bad they signal to every visitor that maintenance has been ignored. If you’ve been looking at paver driveways on your street and wondering what it takes to make that upgrade, you’re asking the right question. Learning how to install a paver driveway the right way means understanding the prep work, the materials, and the steps that actually make it last for 25+ years.
In this guide, we’ll walk through everything: material selection, base preparation, driveway paver installation steps, cost expectations, and long-term maintenance. Whether you’re weighing a DIY paver driveway against hiring a pro, or you just want to know what the job actually involves before you call someone, this is the right place to start.
Table of Contents
ToggleWhat Is a Paver Driveway and Is It Right for Your Home?
A paver driveway is a hard surface consisting of individual interlocking pavers, made of concrete, clay brick or natural stone, laid over a compacted base. Each unit is laid down individually ( unlike poured concrete or asphalt ) making repairs easier and design options significantly wider .
Pavers have one huge advantage over concrete and that is, if a part fractures or settles simply lift and relay those pavers. You don’t dynamite the whole driveway.
Paver driveways also do well in the unique conditions of Southern California. The area has thick clay soil that expands and shrinks with rainfall. This is one of the primary reasons that standard concrete driveways crack within 10 years or less. A paver base that is correctly built, with good compaction and drainage slope, will flex with that movement rather than fight it.
Paver Driveway vs. Concrete vs. Asphalt
| Feature | Paver Driveway | Concrete | Asphalt |
| Lifespan | 25-50 years | 20-30 years | 15-20 years |
| Repair | Replace individual pavers | Full section replacement | Patching or reseal |
| Curb Appeal | High – many patterns/colors | Moderate | Low |
| Upfront Cost | $10-$50/sq ft installed | $6-$12/sq ft | $3-$7/sq ft |
| Clay Soil Performance | Excellent with proper base | Moderate – prone to cracking | Good – flexible surface |
| Maintenance | Low – periodic joint sand | Low – occasional sealing | Moderate – reseal every 3-5 yrs |
Understanding the Basics of Paver Driveway Construction
A paver driveway is only as good as what’s beneath it. The surface pavers get all the attention, but the base layers are what determine whether your driveway lasts 10 years or 40.
Here’s how the layers stack from the ground up:
- Subgrade: The native soil, compacted and graded for proper drainage slope (1-2% away from the home)
- Crushed stone base: 4-6 inches of 3/4-inch minus crushed stone, compacted in 2-inch lifts
- Bedding sand layer: 1 inch of washed concrete sand, screeded flat but NOT pre-compacted
- Pavers: Laid in your chosen pattern, tight against each other
- Edge restraints: Installed along all open edges to prevent migration
- Polymeric joint sand: Swept into gaps and locked in place with compaction and light moisture
How Deep Should You Excavate?
For standard residential vehicles, excavate 7-9 inches below finished grade. For heavier use trucks, RVs, or multiple vehicles go to 10-12 inches. In Southern California’s clay soil, we often recommend erring toward the deeper end to allow for adequate base thickness.
Choosing the Best Materials for Your Paver Driveway
Material choice affects cost, appearance, and long-term performance. Here’s what each type offers:
Concrete Pavers
Concrete pavers are the most popular option for residential driveways. They’re manufactured in consistent sizes, come in dozens of colors, and cost $2-$8 per square foot in materials. They handle high traffic loads well when installed at the recommended 60mm (2.36 inches) minimum thickness.
Clay Brick Pavers
Clay brick pavers are kiln-fired, which makes them extremely dense and resistant to staining. Their color runs all the way through the material, so they don’t fade the same way concrete pavers can. Expect to pay $3-$12 per square foot in materials. They’re especially popular in classic and traditional home styles.
Natural Stone Pavers
Granite, travertine, and bluestone offer a premium look that’s genuinely hard to replicate. Material costs run $10-$30+ per square foot. For most driveways, the expense is the main limiting factor but for high-end properties, natural stone adds real resale value.
Best Paver Patterns for Driveways
- Herringbone (90° or 45°): Best for driveways the interlocking angle distributes vehicle load across multiple pavers instead of concentrating stress on individual units
- Running bond: Clean, modern look but less load-bearing strength than herringbone
- Basketweave: Classic appearance, works well for lower-traffic areas near the entry
- Ashlar/random: Works with natural stone, creates an organic look
How Much Does It Cost to Install a Paver Driveway?
Paver driveway cost depends on size, material, site conditions, and labor rates in your area. In Los Angeles County, installed costs typically run $15-$50 per square foot for a full professional installation. A standard two-car driveway (400-600 sq ft) runs between $6,000 and $30,000 depending on the material selected.
Cost Breakdown by Material Type
| Paver Type | Material Cost (per sq ft) | Installed Cost (per sq ft) | 400 sq ft Driveway Est. |
| Concrete Pavers | $2-$8 | $15-$25 | $6,000-$10,000 |
| Clay Brick Pavers | $3-$12 | $18-$30 | $7,200-$12,000 |
| Natural Stone Pavers | $10-$30+ | $30-$50+ | $12,000-$20,000+ |
DIY Paver Driveway vs. Professional Installation
A DIY paver driveway can save 30-50% on labor, but requires a plate compactor, masonry saw, and a helper. The base preparation phase is where most DIY installations fail. Inadequate compaction leads to uneven settling within 2-3 years.
For driveways larger than 300 square feet, or any site with significant clay soil or drainage challenges, professional installation is the smarter investment.
Step-by-Step Guide: How to Install a Paver Driveway
Here’s the actual process for how to install a paver driveway from site prep to final compaction. Follow each step in order skipping ahead is the number one cause of driveway failures.
Step 1: Check Local Permits and Call 811
Before any digging, call 811 (the national Dig Safe line) to have underground utilities marked. In Los Angeles County, driveway construction often requires a permit from your local building department. HOA approval may also apply. Budget 1-2 weeks for this step.
Step 2: Mark and Excavate the Area
Use stakes and string line to outline the driveway perimeter. Excavate to 7-9 inches for standard vehicles or 10-12 inches for heavier loads. Remove all debris, roots, and soft soil. Grade the subgrade to slope 1-2% away from the home for proper drainage.
Step 3: Install the Crushed Stone Base
Add 4-6 inches of 3/4-inch minus crushed stone base in 2-inch lifts. Compact each lift with a plate compactor, making two passes in opposite directions. This is the most important phase of the entire project don’t rush it. Check for consistent slope throughout.
Step 4: Install Edge Restraints
Before adding sand, install edge restraints along all open edges. Use plastic or aluminum restraints spiked into the compacted base. These prevent the outer pavers from migrating outward under vehicle load over time. Don’t skip this step.
Step 5: Screed the Bedding Sand Layer
Spread 1 inch of washed concrete sand across the compacted base. Use two steel pipes as screed guides, set 1 inch above the base surface. Pull a 2×4 screed board across the pipes to create a flat, even surface. Do NOT compact the sand — it needs to remain loose for the pavers to seat into.
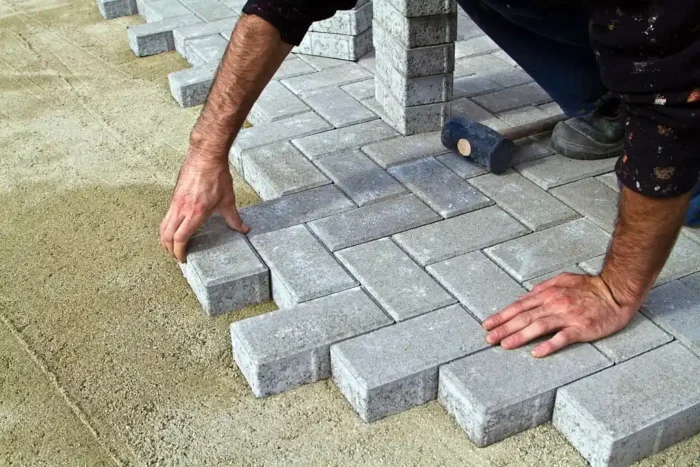
Step 6: Lay the Pavers
Start from a straight edge or corner and work outward. When you install pavers for driveway projects, keep each unit tight against its neighbor following your chosen pattern. Tap each one gently with a rubber mallet to seat it. Check alignment every 6-10 feet with a string line. Cut edge pavers with a masonry saw or splitter.
Step 7: Compact and Add Polymeric Joint Sand
Run a plate compactor (with protective pad) over the entire surface to vibrate pavers into the sand bed. Sweep polymeric joint sand into all joints using a push broom. Compact again. Lightly mist the entire surface with water to activate the polymer binder and lock the sand in place.
Step 8: Seal the Surface (Optional but Recommended)
Sealing isn’t required, but it protects against oil stains, UV fading, and makes cleaning easier. Wait at least 90 days after installation before applying sealant to allow the polymeric joint sand to fully cure. Use a breathable penetrating sealant rated for concrete or clay pavers.
Do You Need to Remove Your Existing Driveway First?
In most cases, yes the existing concrete or asphalt should be removed before installing a paver driveway. Installing pavers over an old concrete slab seems like a shortcut, but it creates drainage problems and prevents proper base compaction, leading to uneven settling within a few years.
The exception is thin overlay systems, but these are designed for patios rather than driveways. Under vehicle load, pavers need a proper crushed stone base to perform correctly. Concrete removal typically adds $1-$3 per square foot to the project cost in the LA County area.
Common Mistakes to Avoid When Installing Paver Driveways
These are the mistakes we see most often on DIY and even some contractor installations:
- Insufficient base compaction: The single biggest cause of early driveway failure. Each 2-inch lift must be compacted before adding the next.
- Wrong sand type: Polymeric sand goes in the joints. Washed concrete sand goes in the bedding layer. Using the wrong material in the wrong layer causes problems.
- Skipping edge restraints: Without them, the perimeter pavers will slowly push outward, creating gaps and an uneven surface within 3-5 years.
- No drainage planning: A flat driveway with no slope pools water against your foundation. Always maintain 1-2% slope away from the home.
- Compacting dry polymeric sand: Always mist the sand after compaction to activate the polymer dry sand doesn’t lock and will wash out.
- Ignoring clay soil: Southern California clay soil needs extra base depth. Standard 4-inch base specs are written for better soil conditions than most LA County properties have.
Maintenance Tips for a Long-Lasting Paver Driveway
A paver driveway is one of the lowest-maintenance driveway surfaces available but it does need some routine attention to stay that way.
- Sweep regularly: Remove leaves and debris before they break down and stain the surface or clog joints.
- Rinse with mild soap: A hose and mild detergent handles most surface staining. Avoid harsh chemical cleaners that can strip the joint sand.
- Reapply joint sand every 3-5 years: Polymeric joint sand gradually erodes. Topping it up prevents weed growth and paver shifting.
- Reseal every 3-5 years (if sealed): A quality breathable sealant adds protection and keeps colors looking sharp.
- Address settling quickly: If a paver sinks or wobbles, pull it up, adjust the sand layer, and relay it. Catching this early prevents a small problem from spreading.
When to Hire a Professional Instead of DIYing
Some driveway projects are genuinely manageable as DIY jobs a small courtyard or walkway with a crew of two and a rented plate compactor. A full two-car driveway is a different animal.
Hire a professional when:
- The driveway is larger than 300 square feet
- Your site has significant slope, clay soil, or drainage issues
- You need to remove and dispose of existing concrete or asphalt
- The project requires permits or city inspections
- You want a warranty on materials and installation
Final Thoughts
Knowing how to install a paver driveway helps homeowners appreciate the precision and planning required especially when choosing Hardscape Services in Whittier, CA for lasting results. Whether you tackle it yourself or hire a professional, following the right steps ensures a strong foundation and attractive finish. A well-built paver driveway can last for decades when installed with quality materials and expert care. For expert installation, maintenance, and trusted Hardscape Services in Whittier, CA, turn to Robert’s Complete Care. Call Robert’s Complete Care today to start transforming your driveway into a space you’ll truly love.
Frequently Asked Questions About Paver Driveway Installation
How deep do you dig for a paver driveway?
Excavate 7-9 inches for standard residential vehicles and 10-12 inches for heavier loads like trucks or RVs. In clay-heavy soils common throughout Los Angeles County, go toward the deeper end of that range to ensure adequate base thickness and drainage performance.
Can I install a paver driveway myself?
Yes, but it requires planning. Knowing how to lay pavers for a driveway correctly means mastering base prep first. You’ll need a plate compactor, masonry saw, and at least one helper. A small driveway takes a full weekend minimum. The base preparation phase is where most DIY projects fail.
How long does a paver driveway installation take?
A professional crew of 3-4 workers can complete a standard two-car driveway (400-600 sq ft) in 2-3 days. Larger or more complex projects run 4-7 days. A DIY installation of the same size typically takes a full weekend plus additional prep time.
Do I need to remove my old concrete driveway before installing pavers?
In almost every case, yes. Installing pavers over existing concrete prevents proper base compaction and creates drainage problems. Budget $1-$3 per square foot in LA County for concrete removal as part of your total project cost.
What is the best base for a paver driveway?
4-6 inches of compacted 3/4-inch minus crushed stone, installed in 2-inch lifts, topped with 1 inch of washed concrete sand as the bedding layer. In clay soil conditions, go with 6 inches of crushed stone minimum.
How long do paver driveways last?
A properly installed paver driveway lasts 25-50 years with routine maintenance. Individual pavers can be replaced without disturbing the rest of the driveway, which is a significant advantage over poured concrete.
Do paver driveways need to be sealed?
Sealing is optional but recommended. It protects against oil stains, UV fading, and moisture penetration. Apply your first sealant 90 days after installation and reapply every 3-5 years depending on traffic and sun exposure.
How much does it cost to install a paver driveway?
In Los Angeles County, professionally installed paver driveways run $15-$50 per square foot depending on material choice. A standard 400 sq ft driveway costs $6,000-$20,000+ installed. Concrete pavers are the most cost-effective; natural stone the most premium.