You save a lot of money doing yard projects yourself. Laying aggregate layers is a simple job that immediately tidies up your property borders. This article will provide you with the exact directions to do this task perfectly.
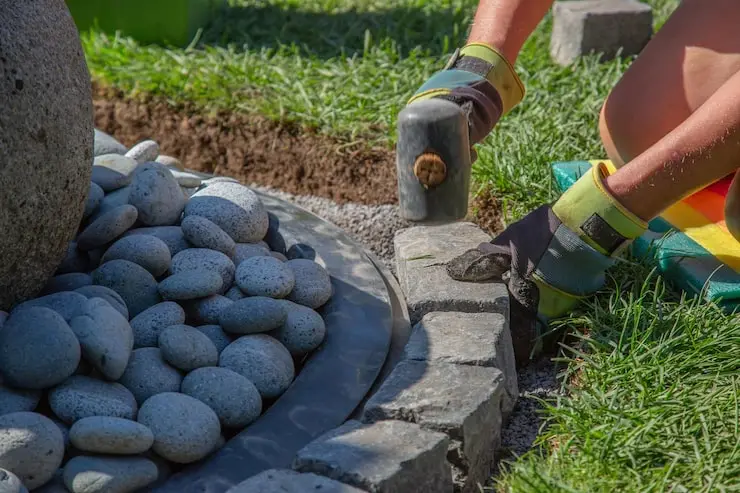
Preparing for landscape rock includes removing the existing vegetation and digging out the dirt to a uniform depth of three inches. Grade the subsoil away from the house footings, compact the surface thoroughly, lay down heavy-duty woven landscape fabric and fix it with steel staples, then spread the stones evenly.
What Is Landscape Rock and Why Install It?
Landscape rock is mineral stones that are mined, washed and sorted for use as a permanent ground cover. These materials are often selected by homeowners in lieu of typical wood mulch or thin patches of turf grass. It creates a long-lasting non-degradable barrier to protect topsoil from wind and high rainfall occurrences.
The selection of stone instead of organic material gives you instant financial and structural advantages for your home’s floor plan. Unlike wood bark, stones do not degrade, rot or lose their color intensity after just one season. You buy them once and they last for decades without inviting wood boring pests such as termites.
Using stone products directly aids in water conservation efforts across your entire neighborhood footprint. It slows down surface evaporation, keeping the underlying native soil cool and moist for deep plant roots. This reduction in water waste helps lower monthly utility bills while maintaining a structured garden layout.
How to Install Landscape Rock: A Step-by-Step Guide
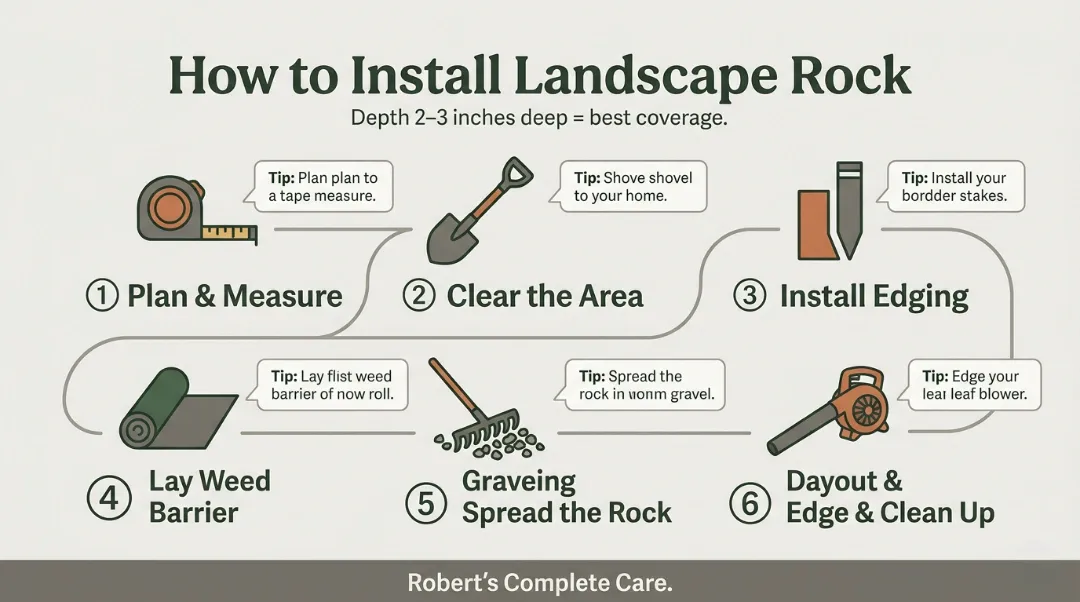
Executing this installation process properly requires a systematic approach to soil preparation and textile pinning. Skipping minor steps in ground clearance always leads to premature structural issues and aggressive weed infestations later. Follow this field-tested sequence to secure a long-lasting, commercial-grade finish on your property.
Tools and Materials Required
Before moving any earth, collect a sturdy steel square-point shovel, a heavy iron bow rake, and a hand tamper. You will also need a mechanical sod cutter for large lawns, heavy-duty utility shears, and a rolling wheelbarrow. Purchase your stones, woven geotextile fabric, matching border kits, and six-inch steel landscape staples in advance.
Benefits of Installing Landscape Rock Around the House
Heavy roof runoff water can wash away perimeter soils and cause structural settling. Installing stone ground cover around housing foundations prevents this. It provides a highly effective, non-flammable barrier that separates framing materials from damp garden soil and wood-destroying underground insects.
Stone layers around your foundation offer better moisture control than organic mulch selections. Wood chips absorb water and trap it against siding boards, producing an ideal environment for wood rot. Stone allows heavy rainwater to run directly down into the subsoil, keeping it away from your concrete structural walls.
Stone materials do not feed spreading brushfires, therefore your suburban home is much safer structurally for wildfire. A five-foot clean stone perimeter around your exterior walls gives you a defensive space zone required by modern safety requirements. This simple concept will save your family and save you money on house insurance in the long run.
How to Build a Rock Garden
A rock garden isn’t just decorative rocks thrown across a flat surface. It’s a layered, intentional design that mimics natural stone formations. Done right, it becomes the focal point of your entire yard.
Choose the Right Location
Rock gardens work best in areas with full sun to partial shade. A sloped area is ideal because it creates natural depth and allows water to drain properly.
Avoid spots that collect standing water after rain. Wet, compacted conditions will cause plant roots to rot and make your rocks sink unevenly over time.
Build Your Base Layer First
Start with larger boulders placed at the base and along the edges. These anchor the design and make the rest of the composition look intentional. Set at least one-third of each large rock into the ground so it looks embedded, not just dropped.
Tilt rocks slightly backward so rainwater runs toward plant roots rather than away from them. This one small detail dramatically improves plant survival rates in rock gardens.
Layer in Medium and Small Rocks
Work upward and inward with progressively smaller rocks. Leave irregular gaps between stones, these become your planting pockets. Use soil mixed with gravel in those gaps for better drainage.
Don’t space rocks too evenly. Nature doesn’t arrange things symmetrically, and your rock garden shouldn’t either.
Considerations to Keep in Mind
Managing a stone landscape requires an understanding of how rock surfaces interact with summer heat and airborne debris. Light-colored rocks reflect sunlight, which can increase the ambient temperature of nearby outdoor living areas and home siding. Dark stones absorb thermal energy all day and radiate that intense heat back into the soil at night.
Airborne dust, dead leaves, and organic pollen will eventually settle into the tiny spaces between your individual stones. If you do not clear this debris annually, it decomposes into rich compost directly on top of your weed barrier. This thin layer of organic matter provides a fertile home for windblown weed seeds to sprout.
Selecting the Perfect Rocks for Your Garden
Not all rocks perform the same. Choosing the wrong type for your climate or design creates problems that are annoying and expensive to fix later.
River Rock
River rock is smooth, rounded, and comes in sizes from half an inch to several inches across. It’s excellent for drainage, around water features, and in areas where foot traffic is minimal.
It shifts underfoot and isn’t ideal for pathways. It also tends to migrate, so you’ll need solid edging to keep it contained.
Crushed Gravel
Crushed gravel packs down well and stays put better than river rock. It’s the go-to for pathways, driveways, and DIY landscape rock projects where stability matters.
The angular edges interlock when compacted, which reduces shifting. Sizes from 3/8 inch to 3/4 inch are most commonly used for garden applications.
Lava Rock
Lava rock is lightweight and porous. It retains moisture in the soil below it, which makes it a smart choice for areas with moisture-loving plants.
The dark color absorbs heat, which can benefit plants in cooler climates but cause stress in extreme heat. It’s also one of the most visually striking options for modern decorative rock landscaping.
Flagstone and Boulders
Flagstone works for patios, stepping stone paths, and defined borders. Boulders act as focal points and can dramatically change the visual scale of a yard.
Both require more physical work to install and typically can’t be done alone. Plan for extra labor if you’re using anything over 50 pounds per piece.
Types of Rocks to Use in Your Landscape
The best rocks for residential landscaping include durable river rocks for drainage swales, fine pea gravel for garden pathways, and angular crushed stones for driveways. Each mineral type offers distinct performance characteristics regarding soil stabilization, moisture movement, and ease of walking.
| Rock Material Variant | Typical Diameter Size Range | Ideal Project Application |
| Smooth Pea Gravel | 1/4 inch to 1/2 inch | Casual walking paths and patio spaces |
| Rounded River Rock | 1 inch to 3 inches | Garden borders and active drainage ditches |
| Decomposed Granite | 1/4 inch minus with fines | High-traffic rustic walkways and fire pits |
| Volcanic Lava Rock | 1/2 inch to 1 inch | High-visibility decorative flower beds |
River Rock vs. Pea Gravel
Analyzing river rock vs pea gravel reveals a major difference in utility and spatial stability under foot pressure. Pea gravel features tiny, rounded shapes that feel soft to walk on, making it ideal for backyard pathways. Larger river rock pieces are heavy and resist displacement from high-velocity stormwater runoff in open drainage paths.
Decomposed Granite Installation
A proper decomposed granite installation requires spreading the material in thin, two-inch layers mixed with a liquid stabilizing binder compound. Run a heavy, motorized plate compactor over each layer to lock the tiny granite particles into a solid surface. This method creates a highly durable, natural-looking pathway that resists erosion from heavy foot traffic and rainwater.
Incorporating Natural Rocks into Your Landscape Design
The best rock landscapes don’t look installed. They look like they’ve always been there.
Use Odd Numbers
Group rocks in odd numbers, threes and fives especially. Even groupings feel symmetrical and artificial. Odd clusters read as natural to the eye.
Vary Size and Texture
Pair smooth river rock with rough-edged fieldstone. Mix fine gravel with large accent boulders. Contrast in size and texture creates visual depth that flat, uniform gravel beds can’t achieve.
Let Plants Break Up the Rock Surface
No rock landscape looks complete without some plant material growing through it. Low-growing ground covers, ornamental grasses, and succulents planted in rock gaps soften the hardscape and tie the design together.
Plants like sedum, creeping thyme, and blue fescue work particularly well in gravel or rock mulch installations because they tolerate poor soil and low moisture.
Common Mistakes to Avoid
The most destructive mistake in stone landscaping is buying cheap, non-woven plastic sheets instead of professional-grade woven weed barriers. Low-grade plastics tear instantly under heavy rocks, allowing aggressive perennial weeds to ruin your hardscape layout within a single growing season.
Piling Rocks Against Wood Siding: Keep stone layers at least six inches below the bottom edge of your exterior house siding.
Neglecting Subgrade Grading: Spreading stones over a sunken dirt pocket forms an invisible underground pond that rots plant roots.
Applying Insufficient Depth: Spreading a single layer of stone exposes the black fabric layer beneath to destructive solar rays.
Skipping the Perimeter Edging: Forgetting to lock your borders down causes stones to spread across your lawn, creating a mowing hazard.
Professional Landscape Rock Installation
For those who want expert help, especially if the project is large or complex, turn to professionals like Robert’s Complete Care. Their skilled team offers expert Landscape Installation in Whittier and beyond, ensuring that your rock landscape is not only beautiful but also built to last.
Hiring professionals guarantees proper measurement, site preparation, and rock installation with top-quality materials and techniques. This means fewer worries and a stunning yard to enjoy for years.
Conclusion
A well-installed rock landscape will make your outdoor space more structured, give it better lines, and make it easier to use for a long time. If you do the appropriate measures and choose the right materials, the results will last for years with little maintenance. If the process seems like it will take too long or you want a professional look, contact Robert’s Complete Care through our page to talk about your landscape installation needs and obtain expert help that is specific to your garden.
Frequently Asked Questions
How do I install landscape rocks in my garden?
Start by clearing the area and removing all vegetation. Install a weed barrier fabric over the soil, secure edging around the perimeter, then spread rock evenly at 2-3 inches deep. Rake smooth and clean up the edges. The whole process for an average 200 sq ft area takes about half a day.
How deep should landscape rock be?
For decorative purposes, 2 inches is the minimum. For weed suppression and a polished look, 2.5 to 3 inches is the standard. Larger river rocks or boulders used as accents can sit shallower since they’re not covering large areas.
Does landscape rock need a weed barrier?
Yes, always. Without fabric, weed seeds blow in and germinate in the fine soil and organic debris that accumulates between rocks over time. A 3 oz. non-woven landscape fabric gives you the best long-term weed protection.
What type of rock is best for landscaping?
It depends on the application. Crushed gravel for paths, river rock for drainage and water features, lava rock for garden beds, and decomposed granite for natural-looking paths or patios. Match the rock to the function first, then to aesthetics.
How much does it cost to install landscape rock?
DIY rock mulch installation typically costs $150 to $400 for a 200 sq ft area depending on rock type. Professional installation runs $300 to $900 for the same area with labor included. Larger boulders and specialty stone increase costs significantly.