An attractive paver driveway will give your home instant curb appeal, lasting strength, and a modern look. When it comes to increasing value and providing a functional, attractive entrance, knowing how to install a paver driveway is a smart place to start. Homeowner projects. While most homeowners find that the investment in hiring professionals such as Robert Complete Care is well worth it, we do have many customers who enjoy taking on the project themselves. You need to know the process, materials, and correct procedures before you start, so you won’t make expensive mistakes down the road. This comprehensive guide covers each stage of the installation so you can determine whether to hire a professional or do part of the work yourself.
Table of Contents
ToggleUnderstanding the Basics of Paver Driveway Construction
Constructing a long-lasting paver driveway is not as simple as placing stones on the ground. There’s planning, excavation, the right base, and then the right installation. Every phase is important since a driveway has to bear the continual weight of vehicles, changing weather, and shifting ground.
Although a driveway that’s installed properly will be able to last for decades, if you skip any steps or use the wrong kinds of materials, you could end up with a driveway that sinks, shifts, or cracks. This is the reason why the experts at Robert Complete Care suggest adhering to tried and tested paver driveway installation steps in order to minimize the risk of having a weak and unsteady surface.
Before you begin collecting materials, measure your driveway space, determine your layout, and select pavers that complement the design of your house. The planning phase paves the way for a smooth install.
Choosing the Best Materials for Your Paver Driveway
The types of materials you choose will have an impact on how your driveway looks and how long it will last. Pavers are available in a variety of shapes, sizes, and styles, and the suitability of each varies with the design you want and the weather conditions in your region.
Selecting the Best Pavers for Driveways
The Best Pavers for Driveways Will Be Strong, Long-Lasting, and Capable of Bearing Heavy Loads. The most popular type of paving is concrete and brick, as these materials are durable and come in a large range of colors and patterns. Concrete pavers are well known for their strength and versatility. Brick pavers have more of a traditional and classic look and do not fade easily.
There are also natural stone pavers, such as granite and limestone, but they are more expensive and require more maintenance. Many homeowners choose these when they desire a high-end finish because they offer understated sophistication with enduring durability.
Understanding Paver Base Materials
A good driveway begins with a solid base. The paver base materials usually are some combination of crushed stone, gravel, and sand. This allows the pavers to remain level while also dispersing weight and preventing shifting.
Crushed stone also offers good drainage. Gravel supports the upper layers; a layer of sand is used on top to assist in locking the pavers in position. Robert Total Care advises using quality-based material to minimize movement and extend the life of your driveway.
Step-by-Step Guide: How to Install a Paver Driveway
Knowing how to install a paver driveway from beginning to end is going to make you aware of how much time, work, and detail are involved. If you are a pro or are installing driveway pavers yourself, you need to follow these steps closely if you want the best chance of success.
Step 1: Planning and Preparation
First things first, mark off your driveway area with stakes and string. This allows you to see the design and provides you with exact measurements for material ordering. Also, make sure to call for underground utilities prior to digging. Call before you dig to prevent surprises.
Then select the pattern and color of your paver. Take into account the style of your house, your landscaping, and how much you want to maintain the pool. Anticipate avoiding hold-ups when you start building.
Step 2: Excavating the Area
Excavating is the process of removing grass, dirt, and debris from the site to make room for the bottom layers. Most driveways need to be dug 7-10 inches deep, although this depends on climate and soil conditions. In regions where the soil contains heavy clay or the rain is abundant, dig deeper.
It’s important to dig out evenly so you don’t end up with weak spots. A shovel will suffice for small patches, but for larger driveways, you need equipment. Robert Complete Care provides commercial equipment to establish the correct depth and compaction in this step.
Step 3: Adding and Compacting the Base Layers
After digging, the correct base layers have to be added. Begin with a layer of crushed stone, distributing it uniformly over the dug-out area. Use a tamper to press it into place. Compaction is necessary because loose material will move over time and cause pavers to sink.
Then apply another layer of gravel and compact it. The last base layer is sand, allowing the pavers to rest smoothly. Make sure that your sand is level, as you will have uneven areas if you try to install your pavers on a slant.
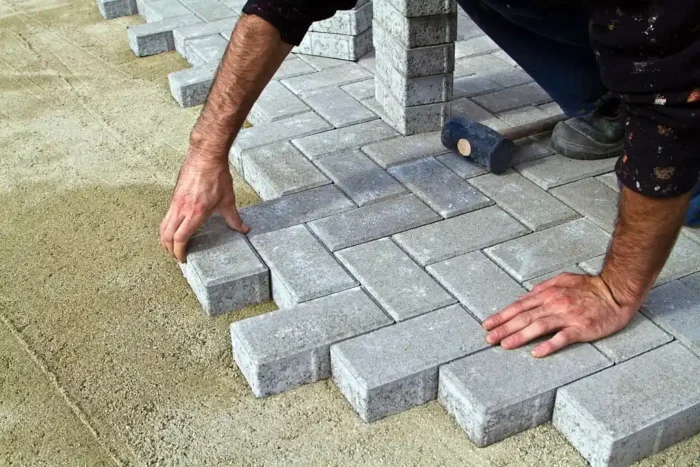
Step 4: Laying the Pavers
Now it’s time to start laying the pavers in the pattern of your choice. Whether you’re laying a herringbone, basket-weave, or running bond pattern, make sure each stone is spaced evenly. Begin at one corner and progress across the driveway.
Rubber mallets are used to gently tap each paver into position without causing damage. Periodically check alignment and spacing to ensure a neat, uniform job.
Step 5: Cutting Pavers as Needed
Not every paver will line up exactly on the edges. Using a masonry saw or a paver cutter, cut the pieces as needed. You need safety goggles and gloves for this step. If you are a novice, cutting is probably the most challenging aspect of installing driveway pavers yourself, so either take your time or consider hiring an expert to lend a hand.
Step 6: Installing Edge Restraints
Edge restraints are necessary to ensure that your pavers don’t migrate as time passes. They are usually made of aluminum or plastic and are staked at the edges of the driveway. This stage helps with retaining the shape and stability of the driveway, mainly when vehicles are passing close to the borders.
Step 7: Adding Joint Sand and Final Compaction
The final step is to pour sand on the pavers and brush the sand into the joints with a broom. This holds the pavers in place and prevents shifting. After taking care of the joints, run the compactor again to get a better finish.
If necessary, add more sand after tamping to fill any voids. When finished, the driveway will appear to be smooth, solid, and ready to hold up.
You may read Cost of Hardscaping?
Maintenance Tips for a Long-Lasting Paver Driveway
Even if the installation is flawless, your driveway will just naturally last longer if you treat it well. Simple measures can save you from big headaches later.
Regular Cleaning
Pavers can hold debris, leaves, and dirt in the seams. A clean driveway looks better and will help against weeds from growing there.
Seal the Surface
The sealer will also protect your pavers from stains, water damage, and sun fading. To retain the color and strength of the surface, sealant should be applied every 2 to 3 years.
Fixing Shifts and Settling
Don’t wait to fix a loose or sinking paver. Take away and reset troubled stones before they cause bigger trouble.
Robert Complete Care provides all your driveway needs, from one-time cleanings to annual maintenance programs, to keep your driveway looking great year after year.
Conclusion
Knowing how to install a paver driveway helps homeowners appreciate the precision and planning required—especially when choosing Hardscape Services in Whittier, CA for lasting results. Whether you tackle it yourself or hire a professional, following the right steps ensures a strong foundation and attractive finish. A well-built paver driveway can last for decades when installed with quality materials and expert care. For expert installation, maintenance, and trusted Hardscape Services in Whittier, CA, turn to Robert’s Complete Care. Call Robert’s Complete Care today to start transforming your driveway into a space you’ll truly love.
FAQs
1. What are the main paver driveway installation steps?
The following are the most essential steps to the paver driveway installation: design, excavation, construction of the base layers, laying pavers, cutting edges, compacting, and applying joint sand.
2. Can I install driveway pavers myself?
Yes, you can install driveway pavers yourself as long as you have the right tools, time, and experience. But why not have professional installation with Robert Complete Care for the best results that will last?
3. Is it difficult to learn how to do a paver driveway?
Installing a paver driveway can be done by novices, but you need some patience, some precise measuring, and some good preparation. The process can also be a little bit easier by following clear instructions, with the right tools and materials.
4. What are the critical steps in paver driveway installation?
All the basics are here: planning the layout, excavating the site, applying the paver base materials, compacting the soil, laying the pavers, and sand joints. The following are over ten skills when continuing this easy( while still heavy) work; omit or skip any step in making this your driveway.
5. Are driveway pavers worth it if you install them yourself?
Yes, installing it yourself will save you thousands of dollars in labor costs. But it calls for time, work, and precision. Many homeowners also prefer to tap into the expertise of professionals like Robert Complete Care for assured longevity and even leveling.
6. Which are the best pavers for driveways?
Concrete pavers, brick pavers, and natural stone pavers do lead the pack. Concrete pavers are the most popular due to their strength, style options, and cost-effectiveness.